macOS User Guide
- What’s in the menu bar?
- Work on the desktop
- Search with Spotlight
- Quickly change settings
- Get notifications
- Open apps from the Dock
- Organize your files in the Finder
- Connect to the internet
- Browse the web
- Preview a file
- Take a screenshot
- Change your display’s brightness
- Adjust the volume
- Use trackpad and mouse gestures
- Use Touch ID
- Print documents
- Keyboard shortcuts
- Apps on your Mac
- Work with app windows
- Use apps in full screen
- Use apps in Split View
- Use Stage Manager
- Get apps from the App Store
- Install and reinstall apps from the App Store
- Install and uninstall other apps
- Create and work with documents
- Open documents
- Mark up files
- Combine files into a PDF
- Organize files on your desktop
- Organize files with folders
- Tag files and folders
- Back up files
- Restore files
- Change System Settings
- Choose your desktop wallpaper
- Add and customize widgets
- Use a screen saver
- Add a user or group
- Add your email and other accounts
- Automate tasks with Shortcuts
- Create Memoji
- Change your login picture
- Change the system language
- Make text and other items on the screen bigger
- Set up a Focus to stay on task
- Set up Screen Time for yourself
- Use Dictation
- Send emails
- Send text messages
- Make a FaceTime video call
- Edit photos and videos
- Use Live Text to interact with text in a photo
- Start a Quick Note
- Get directions
- Work across devices using Continuity
- Use iPhone as a webcam
- Use iPhone with Desk View
- Stream audio and video with AirPlay
- Use one keyboard and mouse to control Mac and iPad
- Hand off between devices
- Unlock your Mac with Apple Watch
- Make and receive phone calls on your Mac
- Sync music, books, and more between devices
- Manage Apple ID settings
- Set your Apple ID picture
- What is iCloud?
- What is iCloud+?
- Store files in iCloud Drive
- Share and collaborate on files and folders
- Manage iCloud storage
- Use iCloud Photos
- What is Family Sharing?
- Set up Family Sharing
- Set up Screen Time for a child
- Share purchases with your family
- Watch and listen together with SharePlay
- Share a Photo Library
- Collaborate on projects
- Find content shared with you
- Find your family and friends
- Play games with your friends
- Listen to podcasts
- Watch TV shows and movies
- Read and listen to books
- Read the news
- Track stocks and the market
- Apple Music
- Apple Arcade
- Apple News+
- Podcast shows and channels
- Manage subscriptions in the App Store
- View Apple family subscriptions
- Guard your privacy
- Use Mail Privacy Protection
- Control access to your camera
- Use Sign in with Apple for apps and websites
- Set up your Mac to be secure
- Keep your data safe
- Create a passkey
- Understand passwords
- Keep your Apple ID secure
- Find a missing device
- Get started with accessibility features
- Connect an external display
- Use the built-in camera
- Connect a Bluetooth device
- Use AirPods with your Mac
- Optimize your Mac battery life
- Optimize storage space
- Burn CDs and DVDs
- Control accessories in your home
- Use Windows on your Mac
- Resources for your Mac
- Resources for your Apple devices

Use DHCP or a manual IP address on Mac
An Internet Protocol (IP) address is a number that identifies each computer across the internet or a network. When you connect to the internet or an IP network, your computer needs an IP address.
Your IP address can be provided in two main ways:
Automatically: Your computer is assigned an address using Dynamic Host Configuration Protocol (DHCP).
Manually: Your ISP or network administrator gives you an IP address, and you enter it in Network settings.
Follow these steps to enter your IP address or have it assigned automatically.
Open Network settings for me
Click the network connection you want to use on the right, then click Details.
Click TCP/IP.
Click the Configure IPv4 pop-up menu, then choose an option:
If your address is assigned automatically, choose Using DHCP.
If your ISP or administrator gave you an IP address, choose Manually, then enter the address in the IP address field. If your ISP gave you additional information such as the subnet mask and router, enter those values in the labeled fields.
Note: Most IP addresses are IPv4 addresses, which look like a series of numbers separated by three periods, similar to this: 123.45.67.89. If you received an IP address that’s a longer series of numbers and letters, divided by seven colons (for example, fa80:0000:0000:0123:0203:93ee:ef5b:44a0), it’s a different type of IP address called IPv6. To enter an IPv6 address, click the Configure IPv6 pop-up menu, choose Manually, then enter your IPv6 address.
How to Set a Static IP Address on a Mac
Matt Cone February 19, 2021 Tutorials Mac Network
When your Mac is connected to a private network in a home or office, it’s probably assigned what’s known as a dynamic IP address . (To check, see How to Find Your Mac’s IP Address .) That’s not a problem for the majority of users - most people don’t care whether their IP addresses changes or not. But dynamic IP addresses won’t work for certain tasks like port forwarding, dynamic DNS, or client-to-client file sharing on the local network. For those unique situations and others, only a static IP address will work.

By setting a static IP address in macOS, you’ll create a permanent, private IP address for your Mac that won’t change from one day to the next. Other devices connected to the local network will be able to access your Mac, and if you set up port forwarding, certain services running on your Mac will be accessible to the outside world.
Here’s how to set a static IP address in macOS:
If you own a MacBook, you may want to create a new network location. This will allow you to use the static IP address for certain networks and not others. See How to Configure Network Locations in OS X for instructions.
From the Apple menu, select System Preferences .
Select Network . The window shown below appears.

From the sidebar, select an active network interface. In this example, I’m connected to a wireless network, so I’ll select Wi-Fi .
Make a note of the current IP address assigned to your Mac. You’ll need to select a new IP address from within the private IP address range listed. More on that in a minute.
Click Advanced .
Select TCP/IP . The window shown below appears.

From the Configure IPv4 menu, select Manually .
Enter a static IP address in the IPv4 Address field. What number should you enter? One method is to take your current IP address and change the last part of the number. In this example, I could have picked any address between 192.168.7.0 and 192.168.7.255 , as long as the address was not already assigned to another device.
Click Apply .
Congratulations! You have successfully set a static IP address for your Mac. Now the other devices on the private network can access your Mac by using the static IP address you assigned it. Just remember to switch network locations if you start using a different network - others may not take kindly to you using a static IP address on their network.
Related Articles
- How to Find Your Mac’s IP Address
- How to Configure Network Locations in OS X
Subscribe to our email newsletter
Sign up and get Macinstruct's tutorials delivered to your inbox. No spam, promise!
About Privacy Policy Terms and Conditions
© 2023. A Matt Cone project. CC BY-NC-SA 4.0 . Made with 🌶️ in New Mexico .
Setting the IP Address by Using the ARP/PING Command
- PRO Courses Guides New Tech Help Pro Expert Videos About wikiHow Pro Upgrade Sign In
- EDIT Edit this Article
- EXPLORE Tech Help Pro About Us Random Article Quizzes Request a New Article Community Dashboard This Or That Game Popular Categories Arts and Entertainment Artwork Books Movies Computers and Electronics Computers Phone Skills Technology Hacks Health Men's Health Mental Health Women's Health Relationships Dating Love Relationship Issues Hobbies and Crafts Crafts Drawing Games Education & Communication Communication Skills Personal Development Studying Personal Care and Style Fashion Hair Care Personal Hygiene Youth Personal Care School Stuff Dating All Categories Arts and Entertainment Finance and Business Home and Garden Relationship Quizzes Cars & Other Vehicles Food and Entertaining Personal Care and Style Sports and Fitness Computers and Electronics Health Pets and Animals Travel Education & Communication Hobbies and Crafts Philosophy and Religion Work World Family Life Holidays and Traditions Relationships Youth
- Browse Articles
- Learn Something New
- Quizzes Hot
- This Or That Game New
- Train Your Brain
- Explore More
- Support wikiHow
- About wikiHow
- Log in / Sign up
- Computers and Electronics
- Operating Systems
How to Change the IP Address on a Mac: 4 Simple Methods
Last Updated: December 8, 2023 Fact Checked
Using a VPN
Using a proxy server, changing the ip address in network settings, unplugging your router/modem.
This article was co-authored by wikiHow staff writer, Megaera Lorenz, PhD . Megaera Lorenz is an Egyptologist and Writer with over 20 years of experience in public education. In 2017, she graduated with her PhD in Egyptology from The University of Chicago, where she served for several years as a content advisor and program facilitator for the Oriental Institute Museum’s Public Education office. She has also developed and taught Egyptology courses at The University of Chicago and Loyola University Chicago. This article has been fact-checked, ensuring the accuracy of any cited facts and confirming the authority of its sources. This article has been viewed 353,637 times. Learn more...
Changing your IP address can be useful if you want to avoid being attacked by other users who are targeting your IP address, or if you simply want a new online identity from an IP standpoint. You can change your IP address on a Mac at any time through System Settings (or System Preferences, if you’re using a version of macOS older than Ventura).
Things You Should Know
- The easiest way to change your IP address is with a VPN or Proxy.
- If you have a static IP address from your ISP, you can change your IP in System Settings.
- You may be able to get a new IP by restarting your router or modem.

- Some of the most popular VPNs for Mac include Surfshark, ExpressVPN, and NordVPN. Most of these services are available for a low monthly subscription fee.
- There are also free VPNs available, but they may not be as fast or secure.

- You can check your public IP address before and after activating the VPN to make sure it’s working right.

- A proxy server works similarly to a VPN, but it’s less secure.

- In pre-Ventura versions of macOS, you will find these options in a drop-down menu under Select a protocol to configure .
- Select “SOCKS Proxy” if you are unsure about which protocol to choose. The “SOCKS Proxy” protocol is often used to route network packets between clients and servers through a proxy and is effective at boosting general security and hiding the client address of applications.
- Web Proxy (HTTP) and Secure Web Proxy (HTTPS) are also commonly used but are less protected than a SOCKS Proxy.

- Some lists of proxy servers may show the IP address and port separately, while others will display the IP address followed by a : , then the port number.
- There’s a list of SOCKS proxies here: https://spys.one/en/socks-proxy-list/ .
- You can find many lists of public proxy servers with a simple web search. Use terms like “Free proxy server list.”

- This method will only work if you have a static IP address to use. You’ll likely need to request one from your ISP (internet service provider), and you may need to pay extra for this service.

- In earlier versions of macOS (before Ventura), this is called System Preferences .

- In Ventura and later, you’ll see your networks at the top of the main Network window. In pre-Ventura versions of macOS, they’re on the left side of the window.

- Alternately, you can click on “Renew DHCP Lease” to have your computer automatically generate a new IP address for you. [2] X Research source

- Wait a couple of seconds or minutes. Most residential connections have what is called a Dynamic IP Address. This means that your Internet Service Provider gives you a new IP address each time your router or modem connects to their network. [3] X Research source
- This method isn’t guaranteed to work. In some cases, you may need to wait a few hours or even days for the IP address to change, and sometimes it won’t work at all.

- If that didn't work, unplug your modem again and wait a few hours before plugging it back in. [4] X Research source
Community Q&A
- If you want to block or mask your existing IP address, consider using a VPN or proxy server instead of changing your IP address. Keep in mind that using a proxy server may slow down your Internet speed, but will help keep your online identity anonymous without requiring you to change your IP address. Thanks Helpful 0 Not Helpful 0
You Might Also Like

- ↑ https://support.apple.com/guide/mac-help/enter-proxy-server-settings-on-mac-mchlp2591/mac
- ↑ https://osxdaily.com/2013/02/11/renew-dhcp-lease-mac-os-x/
- ↑ https://www.techbout.com/change-ip-address-4067/
- ↑ https://whatismyipaddress.com/change-ip
About This Article

1. Click the Apple logo and click System Preferences. 2. Click Network . 3. Click your current network and click Advanced . 4. Click the TCP/IP tab. 5. Choose Manually from IPv4 . 6. Type a new IP Address. 7. Click OK and Apply . Did this summary help you? Yes No
- Send fan mail to authors
Is this article up to date?

Featured Articles

Trending Articles

Watch Articles

- Terms of Use
- Privacy Policy
- Do Not Sell or Share My Info
- Not Selling Info
Keep up with tech in just 5 minutes a week!
How to Manually Configure IP Address on Mac

Introduction: How to Manually Configure IP Address on Mac

An IP(Internet Protocol) address serves as your computer's identification. It may sometimes be necessary to know what your IP address is and how to change it for reasons such as troubleshooting, networking and file-sharing.
Step 1: System Preferences

Open System Preferences by: a) going to the Apple Menu (on the upper left hand corner of the screen) and selecting System Preferences; or b) clicking on the System Preferences icon on the Dock.
Step 2: Network

Click the Network icon.
Step 3: Active Network Connection

On the left hand side of the window is a list of connections. Select the active connection (i.e. the one with a green dot). If your security settings are set to require password to unlock each system preferences pane, click on the padlock icon on the lower left hand side of the window. This will prompt you to enter your password. If you have successfully entered your password, the padlock icon will unlock. NOTE : You do not have to "unlock" if you are only to view your IP address and not edit it.
Step 4: Advanced Options

Click on the Advanced button. It is found on the lower right hand side of the window.
Step 5: IP Address

Click on the TCP/IP tab. The numbers labeled IPv4 Address is your IP address.
Step 6: Configure IP Adress

Click the drop-down menu labeled "Configure IPv4." Select "Manually." The values for IPv4 Address, Subnet Mask and Router will be editable. Enter your desired values for the IP address and click the OK button when you are done.
Step 7: Apply/Revert

Click on the Apply button to save your configuration. If you wish to reset the values you've edited, click the Revert button. Click the padlock icon to protect your settings.
Recommendations

All Things Pi Contest

Engineering in the Kitchen - Autodesk Design & Make - Student Contest

Made with AI - Autodesk Design & Make - Student Contest

DEV Community
Posted on Sep 25, 2021
How To Set a Static IP Address in macOS Using Command Line
Imagine you have an Apple device like a Macmini, MacBook, or an iMac in a remote location. You only have access to it via SSH and no Desktop GUI interaction is allowed.
What if you wanted to change the IP address of the device? For example, how do you assign a static IP address instead of DHCP?
Command line is your option in that case.
Let's see how to get it done...
Make sure you are in the sudoers list
To make changes like network interface configurations, you need to be a user with super user privileges.
Follow the below commands
First, get a list of all your network services.
That command will result in an output like below.
Then use the desired service name in the following command:
For example, to change the IP address of my Wi-Fi interface, I would use a command like this:
In the above example, 192.168.1.2 is my new IP address. 192.168.1.1 is the address of the default gateway, which is the router most of the time.
Setting it back to DHCP
To set it back to DHCP, use the following command:
Keep DHCP with a manual IP
To keep DHCP services but only use a manually designated IP address, then use the following command:
Confirm settings are permanent
Restart the device sudo shutdown -r now and see if the new address persists.
If everything goes well, it should persist.
Top comments (0)
Templates let you quickly answer FAQs or store snippets for re-use.
Are you sure you want to hide this comment? It will become hidden in your post, but will still be visible via the comment's permalink .
Hide child comments as well
For further actions, you may consider blocking this person and/or reporting abuse

🦋🧚🏽♂️👽🫶🏽🖕🏼🤖🤬🧩🌠🪬🎀🔆
Kate Carlin - Mar 31

Insights as a 22yo Software Engineer
Abhin Rustagi - Mar 31

My routine as an Analytics Engineer
Letícia Moura - Mar 31

Unpacking the xz Backdoor Incident: A Critical Alert for Linux Users
Wahit Fitriyanto - Mar 31

We're a place where coders share, stay up-to-date and grow their careers.
How to Find and Change the IP Address on Your Mac
It's simple, whether you need to fix a problem or just confirm your Mac's IP address.
Quick Links
How to find your ip address on a mac, how to change the ip address of your mac, how to set a manual ip address on macos, ip address conflict troubleshooting, public vs. private ip addresses on mac, key takeaways.
- You can find and change your Mac's IP address through the Network panel in System Settings or by using Terminal commands.
- Changing your IP address can help resolve network conflicts, such as when you receive an "another device is using your IP address" message.
- If you set a manual IP, it's important to reserve this in your router to make sure your Mac consistently uses the same address.
Need to double-check your Mac's IP address or adjust it to avoid a network conflict? We'll show you how to easily find and change the IP address of your Mac.
The easiest way to check your Mac's IP address is through the Network panel in System Settings . Click the Apple menu in the top-left of your screen and choose System Settings to open it, or use Cmd + Space to search for "settings" with Spotlight.
Here, click Network from the left sidebar to open the relevant menu. Your current network shows at the top, with a green Connected dot—this is Wi-Fi , assuming you're using a wireless connection. Click the one you're using.
On the resulting page, you'll see the name of your current network at the top. Click the Details button next to this to open a new window with full information about the network.
There, you'll see an IP address field, which displays the current private IP address of your Mac on your network. For convenience, the Router 's IP address is also shown. You can select these addresses to copy and paste them elsewhere.
View Your Mac's IP Address Through the Terminal
The above method is quick and reliable, but you can also see your Mac's IP address using a Terminal command if you don't want to click through multiple menus. Open Terminal by searching for it on Spotlight ( Cmd +Space ).
Next, enter the following command to show your IP address on a Wi-Fi connection:
For an Ethernet connection, use this command instead:
Either way works; if you can memorize this handy Terminal command , it's a bit faster than clicking through the System Settings menus.
While viewing your computer's IP address is enough in some cases, what about when you need to get a new IP address on your Mac? This is necessary if you see the "another device is using your IP address" message, though you can change your IP address for other reasons too.
To change your Mac's IP address, head back to the same Network menu mentioned above. On the window where you confirmed your Mac's IP address, click the TCP/IP menu on the left. This shows more details about your Mac's current network connection. Next to Configure IPv4 , you'll probably see Using DHCP .
DHCP, or Dynamic Host Configuration Protocol , allows routers to automatically manage IP addresses. This is why when you connect a new device to your network, you don't have to manually select an open IP address for it.
To get a new IP address from your router, click the Renew DHCP Lease button. This will result in your computer releasing its IP address and getting a new one, which should resolve any duplicate IP errors.
If you want more control over your Mac's network settings, you can assign an IP address manually (also called a static IP). With this option, the specified address will not change for your device, which can further help resolve issues with duplicate IP addresses.
To set a static IP address on your Mac, return to the TCP/IP tab mentioned above. In the Configure IPv4 field, click Using DHCP and change it to Using DHCP with manual address .
You can also choose Manually if you want. However, the former option is more convenient as it only has you specify the IP address, so you don't need to confirm other information like your router's IP.
Finding an Unused IP Address
When setting a manual IP, you'll need to choose an IP address that isn't already in use on your network. Otherwise, you'll create a duplicate IP problem. While you can log into your router to check IP addresses in use , it's faster to check for an open one using the Terminal.
To do so, you first need to know the IP format of your network. You'll find this on the TCP/IP tab visited earlier—the address of the Router is the format your network uses. This is often 192.168.0.X (with the last digit being unique to each device) but you should double-check what yours is.
Once you know, use Cmd + Space to open Spotlight and search for Terminal. Then enter the following command to ping an address and see if it exists on your network, replacing the address with one you want to use:
If this results in something like 64 bytes from 192.168.0.102 followed by other information, that means a device with that address exists on your network and is responding to your ping. Don't use that address for your Mac; try the ping command again with a new address until you find one that's available.
If you have lots of devices on your network, you might wish to use the arp -a command to filter out unavailable options. This displays all IP addresses on your network at once, showing what's already in use.
When your ping to an IP repeatedly shows Request timeout , you've found a free address. You can enter that IP address in the IPv4 Address field of the Network settings page. Once you do this and confirm with OK , your Mac's IP address will stay the same unless you change it.
Reserving a Manual IP in Your Router
For best results, when you set a manual IP address on your Mac, you should also reserve that address in your router. That way, your router knows that your Mac expects to always use the same address.
To open your router's management panel, open your browser and type the IP address that appears next to Router in the TCP/IP panel you used earlier. You'll then need to log in with your router admin and password, which is different than the password you connect to Wi-Fi with.
If you've never logged into your router before, check Routerpasswords.com to find the default for yours, then be sure to change it for security. And if you're not familiar with working in a router, you may want to read our general router introduction first.
IP address reservation options will differ slightly depending on your router. On my ASUS router, for instance, the relevant menu is under LAN > DHCP Server . Turn Enable Manual Assignment on, then in the box below, you can select a device and reserve an IP address for it. You don't need to change the DNS Server , but you may want to set the Host Name , Description , or similar box to remember what's what.
Given that the router identifies devices by MAC address (not related to the Mac platform), you'll need to pick out your Mac from the list. I've previously named my devices (under Network Map ) to make them easier to identify. If you're not sure which item is your Mac, you'll need to find your Mac's MAC address manually.
See our guide to static IP addresses for more help.
If you needed to change your Mac's IP address because you saw an "another device is using your IP address" error, resetting and renewing your IP address or assigning a manual IP should have fixed the problem. If not, we have a guide to fixing IP address conflicts that you should consult next.
No two devices on your network can have the same address, since your router won't know which is which. This is why you see this message, which shouldn't happen unless your router is acting up or you've manually assigned a duplicate address.
However, it can also happen if a computer is in hibernate mode for a long time; when it wakes up, it might have an old IP address that your router has since assigned to something else. In that case, releasing and renewing the address as described above should fix it.
Finally, we should quickly mention the two different kinds of IP addresses for clarity.
Everything we discussed above pertains to private IP addresses, which are used only on your network. Most home networks use the same range of addresses (often starting with 192.168.0.X ), but those values are only used by your local network. A manual (or static) private IP makes it easier to locate devices on your network by their IP addresses.
In contrast, your public IP is what the rest of the internet sees when any device on your network goes online. While you can pay your ISP for a static IP address, a dynamic public IP is fine for most people. Your public IP doesn't affect the "another device is using your IP address" error that you might see on your Mac.
To find your public IP, simply Google "what is my IP address" or visit a site like MyIP.com . We've compared public and private IPs if you'd like more info. And if you want to change your public IP, try one of the best VPN services .
We've looked at how to view your Mac's IP address, as well as changing it if needed. In most cases, you can rely on DHCP and don't need to manage IP addresses manually. While setting addresses by hand does have its uses, the increased overhead isn't worth it unless you're doing so to troubleshoot a problem.
Tips & Tricks
Troubleshooting, how to set a manual ip address in mac os x.
Here will cover how to change a Mac IP address to a manual setting, and also how to pick an IP address which will not be conflicting with another machine on the same network.
Setting a Manual IP Address on Mac
- Launch ‘System Preferences’ from the Apple menu (or Spotlight)
- Click on the “Network” icon
- In the lower right, click on the ‘Advanced’ button
- In the pulldown menu next to “Configure IPv4” select “Manually” (or DHCP with manual address, if that’s what you need)
- Fill in the IP address, subnet mask, and router, as appropriate to the network you are accessing
- Note: If you do not have these details necessary to be compatible with a specific network, ask the network administrator for the proper assigned IP, subnet, and router to use
- Tip: Picking your own manual IP address? The key is to pick a manual IP address which does not conflict with existing IP addresses on the joined network. For example, if the network router IP is “192.168.1.1” and the network has 5 computers in total, manually pick an IP far outside the range of those potential computers (which are likely to be 192.168.1.1 through 192.168.1.6, and so forth, as IPs are typically assigned in a sequential order), so a potential IP address could be “192.168.1.75” or some other number which will not conflict or match an existing network resource
- Click ‘OK’
- Click ‘Apply’ to set the change

That’s it! The settings take effect and you won’t need to reboot. Not too hard right?
Computer users can sometimes be funny, my cousin called me frantically asking me how to manually set his IP address, apparently due to the current network conditions at his lab this was a requirement to be able to have internet access. The guy is brilliant, he’s studying for his PhD but he just automatically assumed that setting a manual IP address was complicated, after I walked him through this, he laughed. Don’t be afraid to get your hands a little dirty! Things on a Mac are almost always easier than you think.
Let us know your experiences and thoughts with setting a manual IP address in macOS, and yes this works the same on every Mac OS X and macOS version ever released (so far anyway).
Enjoy this tip? Subscribe to our newsletter!
Get more of our great Apple tips, tricks, and important news delivered to your inbox with the OSXDaily newsletter.
You have successfully joined our subscriber list.
Related articles:
- How to Create an @iCloud.com Email Address
- How to Set a Static IP Address on a Mac
- How to Use Private MAC Address on iPhone & iPad
- Find a MAC Address in Mac OS X
11 Comments
» Comments RSS Feed
It’s wonderfսl that you are getting thoughts from this paragraph as well as from our argument made at thіs time.
So if your router is xxx.xxx.x.xxx, you keep xxx.xxx.x., and replace the rest with something made up?
i got this problem with my MAC.. Another device on the network is using your computer IP address
where can i get a new IP address..?? should i just make it up or something ??
Yes you can make it up if you want, just be sure to pick one that is far enough out of range as to not conflict. For example, if your router assigns 192.168.1.100 as the base, you might want to pick 192.168.1.157 or some obscure higher number.
How do you know what to change it to?
I am also in Canada and use a ‘service’ called Hotspot Shield which allows me to use American sites, such as TV networks, which are restricted to only US ip addresses.
You can download it free from http://hotspotshield.com/
HotSpot Shield is not secure at all…………. people will prey on your computer..
I’m currently in Canada, but I would like to access to a mexican web site and watch some videos but it doesn’t allow me because I have a canadian ip. what is the proper procedure to change my ip to an other country ip. I try to put manually a mexican ip but didn’t work. What else do I need to do? what is the subnet mask for? If some one knows, that would be really helpful. thanks
@J1335p or anyone who is looking for the answer to his question:
Change your IP through your modem, not through your operating system. Be careful and look up a tutorial concerning your specific modem if possible. Make sure to change your IP address back to dynamic/DHCP in your operating system first!
I have a media player that is connected to my tv, and i use my network to watch it wirelessly from my mac, but every time i try to watch something it seems the ip address has changed and i have to find what it has changed to and re-enter that information into my media player. i tried to set a manual ip well when i do that, safari will not connect to the internet. any idea why?
Hey … could it be anything as for the IP address… cus some douch said hed crash me for no reason so if i change it i could run away from the problem… :D some help me i need to get his IP or change mine…
Leave a Reply
Name (required)
Mail (will not be published) (required)
Subscribe to OSXDaily
- - How to Fix the Apple Watch Squiggly Charging Cable Screen
- - Can You Stop Mirroring Camera on MacBook? Yes… Sometimes
- - Create a Resume with Pages on Mac, iPhone, iPad
- - How to Use the Apple Watch Keyboard: Typing on Apple Watch Directly, & with Dictation, or iPhone
- - Use Both Dark & Light Mode Themes Per App on Mac with Gray
- - WWDC 2024 Set for June 10-14, Expect iOS 18, macOS 15, visionOS 2, etc
- - MacOS Sonoma 14.4.1 Update Released with Bug Fixes & Security Updates
- - iOS 17.4.1 Update Released for iPhone & iPad with Bug Fixes & Security Enhancements
- - USB Hub & External Monitors Not Working After MacOS Sonoma 14.4 Update for Some Mac Users
- - MacOS Ventura 13.6.5 & macOS Monterey 12.7.4 Updates Available
iPhone / iPad
- - How Secure are Personal Hotspot Connections from iPhone?
- - Does ‘Find My’ Work Internationally? Using Find My iPhone/Mac/iPad Abroad
- - Why Did My iPhone Alarm Stop Automatically & Turn Itself Off?
- - NewsToday2: What it is & How to Disable NewsToday2 on Mac
- - Fix “warning: unable to access /Users/Name/.config/git/attributes Permission Denied” Errors
- - What is fileproviderd on Mac & Why Does it Use High CPU?

About OSXDaily | Contact Us | Privacy Policy | Sitemap
This website is unrelated to Apple Inc
All trademarks and copyrights on this website are property of their respective owners.
© 2024 OS X Daily. All Rights Reserved. Reproduction without explicit permission is prohibited.
The Best Gateway for Tech Trends

How to Manual Setup IP Address in Mac
Table of Contents
An IP (Internet Protocol) address is how the Internet knows who your computer is. For things like troubleshooting, networking, and file-sharing, you may need to know what your IP address is and how to Manual Setup IP Address in Mac. When your Mac is connected to a private network in your home or office, it probably gets what’s called a dynamic IP address. See How to Find Your Mac’s IP Address to find out.
Most people don’t care if their IP address changes or not, so that’s not a problem for them. But dynamic IP addresses won’t work for things like port forwarding, dynamic DNS, or sharing files on a local network from one client to another. Only a static IP address will work in these and other unique situations.
By giving your Mac a static IP address in macOS, you’ll give it a private IP address that won’t change from day to day. Other devices on the same local network will be able to access your Mac, and if you set up port forwarding, the outside world will be able to use some of the services running on your Mac.
- Launch ‘ System Preferences ’ from the Apple menu (or Spotlight)
- Click on the “ Network ” icon
- In the lower right, click on the ‘ Advanced ’ button
- In the pulldown menu next to “Configure IPv4” select “Manually” (or DHCP with manual address, if that’s what you need)
- Fill in the IP address, subnet mask, and router, as appropriate to the network you are accessing
- Click ‘ OK ’
- Click ‘ Apply ’ to set the change
How do IP addresses work?
An IP address is a unique string of numbers that is given to each computer or local network. These numbers are often chosen at random. Most of the time, it is used as a way to collect, send, and share information from one place to another. There are several numbers in an IP address, which are separated by periods. This is an example of an IP address: IP addresses usually range from 0 to 255. This means that any number between 0 and 255 can be used in an IP address.
IANA, or the Internet of Assigned Numbers Authority, uses an integrated algorithm to create IP addresses automatically. IANA is a part of ICANN, which stands for the Internet Corporation for Assigned Names and Numbers. This is a well-known organization for anyone who has ever bought a domain name or put money into building their own website.
The network ID is a part of an IP address that is used to identify a particular network or host. Usually, this part of an IP address is near the beginning of the address. The host ID is another part of an IP address that is used to identify a particular IP/TCP network. After a network ID comes a host ID, which can be used with class identifiers and default subnet masks as needed.
Many devices support entering the IP address manually. This information is provided to help guide you through the manual steps used for most devices. If it’s not necessary to enter your IP address manually, it’s recommended to use the easy setup.
However, if you want to share files in a computer to other devices, then you might need a manual assign IP function to set a static IP for the computer so you don’t need to search and confirm the IP address of the computer every time when you want to access it.
To change these settings, choose Apple menu > System Settings, click Network in the sidebar, click a network service on the right, click Details, then click TCP/IP. (You may need to scroll down.) Choose your ISP’s recommended IPv4 configuration method.
- Charge Samsung Galaxy Watch 4 without charger
- Fix: ‘Network Error 0x800704b3’ issue in Windows 11/10
- How to Fix ‘Apex Legends Mobile Network Connection’ Error
- How to Turn on Caret Browsing in Microsoft Edge
- Difference Between An IP Address And A MAC Address
- How to Manual Backups With Time Machine For Mac
- How To Setup a Static IP Address on Raspberry Pi
- Google publishes a manual on modularizing Android apps
Jim Lopez is responsible for managing the daily Compsmag newsletter and testing and reviewing hundreds of mobile devices. Jim's pathological infatuation with Lego continues to eat away at his life savings. Outside of work, he enjoys discussing the distinctions between macarons and macaroons while continuing to spend his life savings on the toy.
Leave a Comment Cancel Reply
Viofo a129 pro duo review 2024: great dash cam, how to take macro photos of water droplets, you may also like, how to fix “pokemon home error code 504” issue, how to fix ‘whatsapp couldn’t link device’ error, how to fix ‘failed to download supervised settings’ in fortnite, how to fix “xbox live error code 80151912” issue, how to fix ‘can’t save ip settings’ error on windows, how to fix “error code tfav0012” in the finals.
- Help Centre
This website uses cookies to improve your experience. We'll assume you're ok with this, but you can opt-out if you wish. Accept Read More
How to Get A New IP Address Mac
- October 18, 2023

Table of Contents
In today’s digital age, having a stable and secure network connection is crucial. However, there may be times when you encounter issues with your internet connection, such as restricted access to certain websites, slow speed, or even being unable to connect at all. One possible solution to these problems is to obtain a new IP address for your Mac.
Changing your IP address can help resolve network-related issues and provide you with a fresh start for your internet connection. In this blog post, we will explore various methods to get a new IP address on your Mac and discuss the benefits of each method. So, let’s dive in and learn how to get a new IP address on your Mac!
Video Tutorial:
The challenge of getting a new ip address on mac.
Acquiring a new IP address for your Mac can be a challenging task, as it involves adjusting network settings and potentially troubleshooting any issues that may arise. Additionally, depending on your network configuration, certain methods may not be suitable or may require advanced technical knowledge. However, by following the methods outlined in this article, you will have the necessary tools to overcome these challenges and successfully obtain a new IP address.
Things You Should Prepare for
Before we proceed with the methods to get a new IP address on your Mac, there are a few things you should prepare:
1. Administrator access: Changing network settings typically requires administrative privileges on your Mac. Ensure that you have the necessary credentials to make these changes.
2. Network information: Familiarize yourself with your current network settings, such as the IP address, subnet mask, default gateway, and DNS server addresses. This information will be required during the IP address configuration process.
Now that you have prepared the essentials, let’s explore the different methods to obtain a new IP address on your Mac.
Method 1: Using the Network Preferences
Changing IP address settings within the Network Preferences is one of the simplest methods to get a new IP address on your Mac. Here’s how you can do it:
1. Open the Apple menu and select " System Preferences. "
2. Click on " Network. "
3. Select the network connection you want to modify from the left sidebar, such as Wi-Fi or Ethernet.
4. Click on the " Advanced " button in the bottom right corner.
5. Navigate to the " TCP/IP " tab.
6. Click on the " Renew DHCP Lease " button. This action will request a new IP address from the DHCP server.
7. Alternatively, you can manually configure a new IP address by selecting " Using DHCP with manual address " and entering the desired IP address and other network details.
Pros: 1. Simple and user-friendly interface. 2. Enables quick renewal of the DHCP lease. 3. Provides the option to manually configure a new IP address.
Cons: 1. Limited to network connections using DHCP. 2. May not work in certain network configurations.
Method 2: Using the Terminal
If you prefer using the command line interface, the Terminal provides a powerful method to get a new IP address on your Mac. Follow these steps to change your IP address using the Terminal:
1. Launch the Terminal application from the Utilities folder in the Applications folder or by searching for it in Spotlight.
2. Type the command " sudo ifconfig en0 down " without quotes and press Enter. Replace " en0 " with the network interface name you want to modify, such as " en1 " for Wi-Fi.
3. Enter your administrator password when prompted and press Enter.
4. Type the command " sudo ifconfig en0 up " without quotes and press Enter. Again, replace " en0 " with the appropriate network interface name.
5. Your network interface will be restarted, and a new IP address will be obtained from the DHCP server.
Pros: 1. Full control over network settings. 2. Works with various network configurations.
Cons: 1. Requires familiarity with command line interface. 2. Mistakes in the command syntax may lead to network connectivity issues.
Method 3: Using a VPN
Using a Virtual Private Network (VPN) is another effective method to change your IP address on a Mac. Here’s how you can do it:
1. Choose a reputable VPN service provider and sign up for their service. There are various options available, both free and paid, so choose one that suits your needs.
2. Download and install the VPN client software provided by your chosen VPN service.
3. Launch the VPN client and log in with your credentials.
4. Select a server location from the available options. Choosing a server in a different location will assign you a new IP address corresponding to that location.
5. Click on the " Connect " button to establish a secure VPN connection.
Pros: 1. Provides enhanced privacy and security. 2. Allows you to choose from a wide range of server locations.
Cons: 1. May require a subscription fee for certain VPN services. 2. VPN connection speed may be slower compared to your regular internet connection.
Method 4: Via Router Configuration
If you have access to your router’s configuration settings, you can change your IP address by modifying the router’s DHCP lease settings. Follow these steps to change your IP address via router configuration:
1. Open a web browser on your Mac and enter your router’s IP address in the address bar. The default IP address is often printed on the router or can be found in the router’s documentation.
2. Log in to the router’s administration panel using the provided username and password. If you haven’t changed these credentials, you can usually find the default login details in the router’s documentation.
3. Navigate to the DHCP settings section or a similar option related to network configuration.
4. Look for an option to " Release " or " Renew " the DHCP lease. Click on this option to acquire a new IP address from the router.
5. Save the changes and restart your Mac to apply the new IP address.
Pros: 1. Modifies the DHCP lease settings for all devices connected to the router. 2. Changes the IP address for the entire network, allowing easy management of IP addresses.
Cons: 1. Requires access to router administration panel. 2. Incorrect configuration changes may disrupt network connectivity.
Why Can’t I Get a New IP Address?
If you are unable to get a new IP address on your Mac, several reasons could be causing this issue. Here are a few possible reasons and their fixes:
1. Conflict with other devices: If there are multiple devices connected to your network with the same IP address, conflicts can occur. To fix this, ensure each device has a unique IP address assigned.
2. DHCP lease duration: The DHCP server typically assigns IP addresses with a specific lease duration. If you are unable to get a new IP address, it may be because your lease has not expired. You can try waiting until the lease duration expires or contact your network administrator to release your current IP address manually.
3. Network configuration restrictions: Some networks, such as corporate or public networks, may have restrictions that prevent users from obtaining a new IP address. In such cases, it is best to consult with the network administrator for further assistance.
Additional Tips
Here are some additional tips to keep in mind when attempting to get a new IP address on your Mac:
1. Restart your Mac: A simple restart can sometimes resolve minor network issues and help you obtain a new IP address.
2. Clear DNS cache: Clearing the DNS cache can improve network connectivity and potentially assist in acquiring a new IP address. Open the Terminal and type the command " sudo dscacheutil -flushcache " without quotes, then press Enter.
3. Contact your Internet Service Provider (ISP): If you have exhausted all available methods and are still unable to get a new IP address, contacting your ISP for support is recommended. They can provide further assistance and diagnose any potential network issues specific to your connection.
5 FAQs about Getting a New IP Address on Mac
Q1: can i change my ip address without the help of my isp.
A: Yes, you can change your IP address on your Mac without the assistance of your Internet Service Provider. By following the methods mentioned in this article, you can acquire a new IP address independently.
Q2: Will changing my IP address affect my internet speed?
A: Generally, changing your IP address should not directly affect your internet speed. However, if you are using a VPN service to change your IP address, the connection speed may be slower compared to your regular internet connection.
Q3: How often should I change my IP address?
A: There is no specific timeframe for changing your IP address. It depends on your personal needs and circumstances. However, if you are experiencing network connectivity issues or need to access region-restricted content, changing your IP address may be beneficial.
Q4: Will changing my IP address improve my privacy?
A: Changing your IP address alone may not significantly improve your privacy. However, using a VPN service to change your IP address can enhance your privacy and security by encrypting your internet traffic and masking your real IP address.
Q5: Can I get a static IP address on my Mac?
A: Yes, it is possible to assign a static IP address on your Mac. This method allows you to manually configure your IP address settings instead of relying on the DHCP server. However, assigning a static IP address requires advanced network knowledge and careful configuration to avoid conflicts.
In Conclusion
You might also like, top best 8 photo filters for mac – add life and color to your pictures, best 7 mp3 converters for mac – enhance your audio conversion experience, the best 7 movie makers for mac – unleash your creativity with stunning videos, how to make new desktop on mac, how to password protect a zip folder on mac, how to make a picture your background mac, the best 6 device monitor for mac – keep an eye on your system performance, the best 6 web design software for mac – build stunning websites with ease.
How To Assign IP Address

- How-To Guides
- Tech Setup & Troubleshooting

Introduction
Assigning IP addresses is an essential task in computer networking that allows devices to connect and communicate within a network. An IP address serves as a unique identifier for each device connected to a network, enabling the exchange of data packets between them. Whether it’s a home network or a large corporate network, the process of assigning IP addresses plays a crucial role in ensuring smooth and efficient communication.
In this article, we will delve into the fundamentals of IP addresses, the different types of IP addresses available, and explore the methods for assigning them. Whether you’re a network administrator, a curious computer enthusiast, or simply want to understand how IP address assignment works, this article aims to provide you with the necessary knowledge.
Understanding IP addresses is the first step towards comprehending their assignment. IP addresses are numerical labels assigned to devices connected to a network. They consist of four sets of numbers separated by periods, such as 192.168.0.1. This addressing scheme provides a way for devices within a network to locate and communicate with one another.
There are two main types of IP addresses: IPv4 (Internet Protocol version 4) and IPv6 (Internet Protocol version 6). IPv4 addresses, consisting of 32 bits, have been the standard for many years. However, with the rapid growth of internet-connected devices, the need for more addresses arose, leading to the development of IPv6 addresses, which consist of 128 bits and provide a virtually limitless pool of addresses.
IP addresses can be assigned in two ways: manual (static) assignment or automatic (dynamic) assignment. Manual assignment involves manually configuring the IP address on each device, ensuring that each one has a unique address within the network. Automatic assignment, on the other hand, involves a central server dynamically allocating IP addresses to devices using protocol-level mechanisms.
In the next sections, we will explore both manual and automatic IP address assignment methods, including the use of the Dynamic Host Configuration Protocol (DHCP) for automatic assignment. We will also look at how to assign IP addresses on different operating systems such as Windows, Mac, and Linux.
Additionally, we will touch on common issues that may arise during IP address assignment and provide troubleshooting tips to help resolve them. By the end of this article, you will have a comprehensive understanding of IP address assignment and be equipped to assign IP addresses to devices within your network efficiently.
Understanding IP Addresses
IP addresses are crucial elements in computer networking, serving as unique identifiers for devices connected to a network. They enable devices to communicate and exchange data packets with one another. To understand IP addresses, let’s dive into their structure and functionality.
An IP address is a numerical label assigned to each device within a network. It consists of four sets of numbers, separated by periods, such as 192.168.0.1. Each set, known as an octet, represents a binary value ranging from 0 to 255. This addressing scheme provides a standardized way for devices to locate and communicate with each other on a network.
The most widely used IP version is IPv4 (Internet Protocol version 4), which utilizes 32-bit addresses. This means there are approximately 4.3 billion unique IPv4 addresses available. However, with the exponential growth of internet-connected devices, the pool of available IPv4 addresses is depleting. To overcome this limitation, IPv6 (Internet Protocol version 6) was introduced, which uses 128-bit addresses. This allows for an astronomically large number of unique addresses, ensuring the continued expansion of the Internet of Things (IoT) and other networked devices.
IP addresses are hierarchical, with different classes and ranges reserved for specific purposes. The most common classification is based on the range of IP addresses allocated to private networks and public networks.
Private IP addresses are used within local networks to facilitate internal communication among devices. They are reserved and cannot be routed over the internet. The most commonly used private IP address ranges are:
- Class A: 10.0.0.0 to 10.255.255.255
- Class B: 172.16.0.0 to 172.31.255.255
- Class C: 192.168.0.0 to 192.168.255.255
Public IP addresses, on the other hand, are globally unique and can be accessed over the internet. Internet service providers (ISPs) allocate public IP addresses to devices connected to their networks. These addresses allow devices to communicate with other devices and servers across the internet.
In summary, IP addresses serve as unique identifiers that enable devices to communicate within networks. Whether it’s a small home network or a large corporate network, understanding IP addresses and their structure is vital when it comes to assigning and managing them effectively.
Types of IP Addresses
IP addresses can be classified into different types based on their purpose and usage. Understanding these types is essential to effectively manage and assign IP addresses in a network. Let’s explore the various types of IP addresses:
1. Public IP Addresses
A public IP address is a globally unique address assigned to a device connected to the internet. This address allows the device to communicate with other devices and servers across the internet. Public IP addresses are obtained from internet service providers (ISPs) and are routable over the internet. Each public IP address can only be assigned to one device at a time, ensuring uniqueness and facilitating direct communication over the internet.
2. Private IP Addresses
Private IP addresses are used within local networks and are not routable over the internet. They provide a means for devices within a network to communicate with each other. Private IP addresses are typically assigned to devices on a home network, office network, or any other private network. These addresses are reserved and do not conflict with public IP addresses. The most commonly used private IP address ranges are Class A (10.0.0.0 to 10.255.255.255), Class B (172.16.0.0 to 172.31.255.255), and Class C (192.168.0.0 to 192.168.255.255).
3. Static IP Addresses
A static IP address is a fixed IP address manually assigned to a device. It remains constant and does not change over time. Static IP addresses are typically used for servers, network devices, and devices requiring consistent network identification. It can be beneficial for certain applications that require a permanent IP address to ensure uninterrupted access and connectivity.
4. Dynamic IP Addresses
Dynamic IP addresses are automatically assigned to devices within a network. These addresses are temporary and subject to change. Dynamic IP address assignment is commonly used by internet service providers (ISPs) to manage their pool of IP addresses efficiently. Dynamic IP addresses are allocated using protocols like the Dynamic Host Configuration Protocol (DHCP), which ensures that devices within a network receive a unique IP address dynamically when connected to the network.
5. Loopback IP Address
The loopback IP address (127.0.0.1) is a special IP address reserved for testing and communication within the local device itself. It allows applications running on a device to communicate with each other using the network protocol stack without the need for an external network connection. The loopback address is commonly used for troubleshooting network-related issues on a local device.
Understanding the different types of IP addresses is crucial for managing and assigning IP addresses effectively in a network. Whether it’s public, private, static, dynamic, or loopback addresses, each type serves a specific purpose in facilitating communication and connectivity within networks.
How IP Addresses are Assigned
IP addresses play a crucial role in facilitating communication between devices within a network. Understanding how IP addresses are assigned is essential to ensure efficient and organized connectivity. In this section, we will explore the two main methods of IP address assignment: manual and automatic.
Manual IP Address Assignment
In manual IP address assignment, each device within a network is individually configured with a specific IP address. This method requires manual intervention to assign a unique IP address to each device. Manual IP address assignment is commonly used in situations where a specific device requires a static IP address, such as servers or network devices that need to maintain a consistent network identity.
To manually assign an IP address, an administrator typically accesses the device’s network settings or control panel and provides an IP address, subnet mask, default gateway, and DNS server information. These parameters ensure that the device has the necessary network configuration to communicate within the network.
Automatic IP Address Assignment
Automatic IP address assignment eliminates the need for manual intervention by dynamically allocating IP addresses to devices within a network. This method is efficient, as it streamlines the process of network configuration and avoids potential conflicts that may arise from manual assignment.
The most commonly used protocol for automatic IP address assignment is the Dynamic Host Configuration Protocol (DHCP). DHCP allows a central server, known as a DHCP server, to dynamically assign IP addresses, subnet masks, default gateways, and DNS server information to devices within the network.
When a device connects to a network configured with DHCP, it sends a DHCP discovery message, requesting an IP address from the DHCP server. The DHCP server responds with an offer, providing an available IP address. The device then sends a request to confirm its intention to use the offered IP address, and once acknowledged by the DHCP server, the device is assigned the IP address for the duration of its connection to the network.
This dynamic allocation of IP addresses ensures that devices within the network receive unique addresses and minimizes the chance of conflicting IP assignments. It also allows for efficient management and reusing of IP addresses as devices connect and disconnect from the network.
Whether it’s manual or automatic IP address assignment, the method chosen depends on the specific requirements and network configuration. In scenarios where static IP addresses are necessary or desired, manual assignment provides full control over IP address allocation. However, for most networks, automatic assignment through DHCP offers a streamlined and efficient approach to IP address management.
Manual IP address assignment is a method of configuring individual devices within a network with specific IP addresses. This approach is used when devices require static IP addresses, meaning the assigned IP address remains constant and does not change over time. Manual IP address assignment provides network administrators with full control over IP allocation and allows for precise management of network resources.
Assigning IP addresses manually involves configuring the network settings on each device. Here is a step-by-step guide on how to manually assign an IP address:
Step 1: Determine the IP Address Range
Before assigning IP addresses, it is important to determine the IP address range that will be used in the network. This range should be consistent with the network’s addressing scheme and should not conflict with any existing IP addresses.
Step 2: Access Network Settings
On each device, access the network settings or control panel. This can usually be done through the device’s operating system settings.
Step 3: Select Manual IP Assignment
Within the network settings, look for the option to manually configure the IP address. This option may be labeled as “Static IP,” “Manual IP,” or similar. Select this option to proceed with manual IP address assignment.
Step 4: Enter the IP Address
Enter the desired IP address in the designated field. Make sure the IP address falls within the determined IP address range. Avoid duplicate IP addresses to prevent conflicts within the network.
Step 5: Set the Subnet Mask
Alongside the IP address, set the subnet mask for the device. The subnet mask determines the network portion of the IP address and helps identify other devices within the same network.
Step 6: Define the Default Gateway
Specify the default gateway IP address. The default gateway serves as the access point for devices to connect to other networks or the internet. It is typically the IP address of the router or gateway device within the network.
Step 7: Configure DNS Server Information
Enter the IP addresses of the DNS servers in the respective fields. DNS servers resolve domain names into their corresponding IP addresses, enabling devices to access websites and services on the internet.
Step 8: Apply the Changes
After entering all the necessary information, apply the changes to finalize the manual IP address assignment. The device will now use the specified IP address for its network connectivity.
Manual IP address assignment provides greater control and stability, especially for devices that require persistent configurations. However, it also requires careful administration to ensure IP address conflicts are avoided and the network remains organized.
Now that you have a clear understanding of manual IP address assignment, you can confidently configure devices with specific IP addresses that suit your network’s needs.
Automatic IP address assignment is a method of dynamically allocating IP addresses to devices within a network. It eliminates the need for manual configuration and provides a streamlined approach to IP address management. Automatic assignment is commonly used in networks where devices do not require specific static IP addresses and can adapt to changing network conditions.
The primary mechanism for automatic IP address assignment is the Dynamic Host Configuration Protocol (DHCP). DHCP allows a central server, known as a DHCP server, to allocate IP addresses, subnet masks, default gateways, and other network configuration parameters to devices that connect to the network.
Here is an overview of how automatic IP address assignment through DHCP works:
Step 1: DHCP Discovery
When a device connects to a network with DHCP enabled, it broadcasts a DHCP discovery message. This message is sent to discover available DHCP servers within the network.
Step 2: DHCP Offer
Upon receiving the DHCP discovery message, one or more DHCP servers respond with a DHCP offer. The offer includes an available IP address, subnet mask, default gateway, DNS server information, and other network configuration parameters.
Step 3: DHCP Request
The device selects one DHCP offer and sends a DHCP request message to the chosen DHCP server. The request confirms the intention to use the offered IP address and requests that the DHCP server reserve it for the device.
Step 4: DHCP Acknowledgment
Upon receiving the DHCP request, the DHCP server acknowledges the request with a DHCP acknowledgment message. This message confirms the reservation of the IP address for the device, along with any additional network configuration parameters.
Step 5: IP Address Lease
The DHCP server assigns an IP address lease duration to the device. This lease determines the duration for which the device can use the assigned IP address. The lease period can be configured on the DHCP server and typically ranges from hours to several days.
Step 6: IP Address Renewal
As the lease period approaches expiration, the device sends a DHCP renewal request to the DHCP server. The server can either renew the lease for the same IP address or assign a new IP address, depending on the availability and configuration.
By using DHCP for automatic IP address assignment, network administrators benefit from simplified network management and resource optimization. DHCP eliminates the manual effort of configuring IP addresses on individual devices and ensures that IP addresses are assigned dynamically, avoiding conflicts and efficiently utilizing available addresses.
Automatic IP address assignment through DHCP is widely supported in various operating systems and network devices. It provides flexibility and scalability, making it an essential component of modern networks.
Now that you have a clear understanding of automatic IP address assignment through DHCP, you can implement this method to efficiently manage IP addresses within your network.
Dynamic Host Configuration Protocol (DHCP)
The Dynamic Host Configuration Protocol (DHCP) is a network protocol that enables automatic and centralized IP address assignment within a network. With DHCP, devices can dynamically obtain IP addresses, as well as other network configuration information, such as subnet masks, default gateways, and DNS server addresses. This protocol simplifies network administration by reducing the amount of manual configuration required and ensuring efficient utilization of IP addresses.
Here are the key components and functionalities of DHCP:
DHCP Server
The DHCP server is a central component in the network responsible for managing IP address assignment. It holds a pool of available IP addresses and leases them to devices on the network. The DHCP server also maintains information about lease durations, configuration parameters, and other network-specific settings.
DHCP Client
A DHCP client is a device that requests IP address assignment from a DHCP server. Clients typically send DHCP discovery messages on the network to locate available DHCP servers and initiate the IP address assignment process. Once a DHCP offer is received, the client sends a DHCP request to confirm and secure the offered IP address.
A DHCP lease refers to the duration for which a DHCP client is allowed to use an assigned IP address. Lease durations are determined by the DHCP server and can be configured to different time intervals, typically ranging from a few hours to several days. Before the lease expires, the client can attempt to renew the lease to maintain its IP address assignment.
IP Address Pool
The IP address pool is a range of available IP addresses that a DHCP server can assign to clients. The pool is configured on the DHCP server and defines the range from which IP addresses are dynamically allocated. The server ensures that each IP address is allocated only once to avoid conflicts within the network.
Address Reservation
In addition to dynamic IP address assignment, DHCP also allows for address reservation. Address reservation associates a specific IP address with a particular device’s unique identifier, such as its Media Access Control (MAC) address. With address reservation, a device is always assigned the same IP address whenever it connects to the network, ensuring consistent configuration and accessibility.
DHCP significantly simplifies network administration by automating IP address assignment and related configuration tasks. It provides scalability, flexibility, and efficient management of IP address resources within a network. DHCP is widely supported by operating systems and network devices, making it an integral part of modern networks.
By leveraging DHCP, network administrators can streamline the process of IP address assignment, reduce manual errors, and adapt to changing network conditions more efficiently. DHCP plays an essential role in maintaining the connectivity and overall performance of networks of all sizes.
Assigning IP Addresses on Windows
Assigning IP addresses on Windows is a straightforward process that can be done through the network settings in the operating system. Windows provides several methods for IP address assignment, including manual (static) assignment and dynamic assignment through the Dynamic Host Configuration Protocol (DHCP).
Here is how you can manually assign an IP address on Windows:
- Open the Start menu and go to Settings. Select “Network & Internet.”
- In the Network & Internet settings, click on “Ethernet” or “Wi-Fi,” depending on which network connection you want to configure.
- Click on “Change adapter options.”
- Right-click on the network adapter you want to configure and select “Properties.”
- In the Properties window, scroll down and select “Internet Protocol Version 4 (TCP/IPv4)” or “Internet Protocol Version 6 (TCP/IPv6), depending on your network setup. Click on “Properties.”
- In the IPv4 or IPv6 properties, select the option to use the IP address manually. Enter the desired IP address, subnet mask, default gateway, and DNS server information.
- Click “OK” to save the changes. The IP address will be assigned to the network adapter.
Dynamic IP Address Assignment via DHCP
If you want Windows to automatically assign an IP address through DHCP, follow these steps:
- Go to Settings and select “Network & Internet.”
- Select “Ethernet” or “Wi-Fi” depending on the network connection you want to configure.
- Right-click on the network adapter and select “Properties.”
- In the Properties window, scroll down and select “Internet Protocol Version 4 (TCP/IPv4)” or “Internet Protocol Version 6 (TCP/IPv6),” depending on your network setup. Click on “Properties.”
- In the IPv4 or IPv6 properties, select the option to obtain an IP address automatically. Ensure that both “Obtain an IP address automatically” and “Obtain DNS server address automatically” are selected.
- Click “OK” to save the changes. Windows will now assign the IP address automatically through DHCP when the device connects to the network.
These steps apply to Windows 10, but the process is similar on other versions of Windows, such as Windows 8 and Windows 7. By manually assigning IP addresses or configuring Windows to obtain IP addresses dynamically through DHCP, you can effectively manage and connect your Windows devices to the network.
Assigning IP Addresses on Mac
Assigning IP addresses on a Mac is a straightforward process that can be done through the network settings in the operating system. Mac computers provide an easy interface for manual (static) IP address assignment as well as dynamic IP address assignment through the Dynamic Host Configuration Protocol (DHCP).
To manually assign an IP address on a Mac, follow these steps:
- Click on the Apple menu in the top-left corner of the screen and select “System Preferences.”
- In the System Preferences window, click on “Network.”
- Select the network connection you want to configure from the list on the left (e.g., Wi-Fi, Ethernet).
- Click on the “Advanced” button.
- In the Advanced settings, go to the “TCP/IP” tab.
- In the “Configure IPv4” or “Configure IPv6” dropdown menu, select “Manually.”
- Enter the desired IP address, subnet mask, router (default gateway) address, and DNS server addresses.
- Click “OK” to save the changes and close the network settings.
To configure a Mac to obtain an IP address automatically through DHCP, follow these steps:
- Open the Apple menu and select “System Preferences.”
- In System Preferences, click on “Network.”
- Choose the network connection you want to configure from the left-side panel.
- From the “Configure IPv4” or “Configure IPv6” dropdown menu, select “Using DHCP.”
- Optional: You can also configure additional DHCP options by clicking on the “DHCP” tab.
It’s important to note that these steps may slightly vary depending on the version of macOS you are using. However, the general process remains the same across different versions.
By manually assigning IP addresses or configuring your Mac to obtain IP addresses automatically through DHCP, you can manage your network connections efficiently and ensure seamless communication between your Mac and other devices on the network.
Assigning IP Addresses on Linux
Assigning IP addresses on a Linux system can be done through the command-line interface or using the network configuration tools available on different Linux distributions. Linux provides flexibility and various methods for both manual (static) IP address assignment and dynamic IP address assignment through the Dynamic Host Configuration Protocol (DHCP).
To manually assign an IP address on Linux, you can follow these general steps:
- Open a terminal or command-line interface on your Linux machine.
- Check the network configuration file for your network interface. This file is typically found in /etc/sysconfig/network-scripts/ and is named based on the interface (e.g., ifcfg-eth0 for Ethernet interface).
- Edit the network configuration file using a text editor like vi or nano .
- Find the line that starts with BOOTPROTO and change the value to static .
- Set the IP address, subnet mask, default gateway, and DNS server information by modifying the corresponding lines in the configuration file.
- Save the changes and exit the text editor.
- Restart the networking service or reboot the machine for the changes to take effect.
Configuring DHCP for dynamic IP address assignment on Linux involves similar steps:
- Check the network configuration file for your network interface ( /etc/sysconfig/network-scripts/ directory).
- Edit the network configuration file using a text editor.
- Find the line that starts with BOOTPROTO and change the value to dhcp .
- Restart the networking service or reboot the machine to activate the DHCP client and obtain an IP address from the DHCP server.
Please note that these steps are general guidelines, and the actual process may vary depending on the Linux distribution you are using. The configuration files and locations might differ slightly, so it’s recommended to consult the documentation or online resources specific to your Linux distribution.
By manually assigning IP addresses or configuring DHCP for dynamic IP address assignment on Linux, you can effectively manage your network connections and ensure seamless communication between your Linux system and other devices on the network.
Troubleshooting IP Address Assignment Issues
IP address assignment issues can sometimes arise when configuring or managing a network. Understanding common problems and troubleshooting techniques can help ensure smooth network connectivity. Here are a few troubleshooting steps to consider when encountering IP address assignment issues:
1. Check DHCP Server Availability
If DHCP is used for IP address assignment, ensure that the DHCP server is operational and accessible. Make sure the DHCP server is configured correctly and has available IP addresses in its address pool.
2. Verify Network Connection
Ensure that the device experiencing IP address assignment issues is properly connected to the network. Check cables, Wi-Fi connections, or any other means of connectivity. Additionally, make sure the network interface on the device is enabled and functioning correctly.
3. Check for IP Address Conflicts
IP address conflicts occur when two devices within the same network have been assigned the same IP address. This can cause connectivity issues. To resolve this, ensure that each device within the network has a unique IP address. Check if any devices have been manually assigned the same IP address or if there are any DHCP configuration errors causing address conflicts.
4. Reset the DHCP Client
If a DHCP client is not acquiring an IP address correctly, try resetting the client’s network settings. This can be done by releasing and renewing the IP address lease. In a command-line interface, use the commands specific to your operating system to release the IP address lease and then renew it (e.g., ipconfig /release and ipconfig /renew in Windows, or dhclient -r and dhclient in Linux).
5. Restart Networking Services
If IP address assignment issues persist, try restarting the networking services on the device. This can help refresh network configurations and potentially resolve any misconfigurations or issues with the network stack. Restarting the network services can vary depending on the operating system or distribution, so refer to the appropriate documentation or online resources.
6. Check Firewall and Security Settings
Firewall or security settings can sometimes interfere with IP address assignment. Ensure that your firewall or security software is not blocking the DHCP traffic or preventing the device from obtaining an IP address from the DHCP server. Adjust the firewall or security settings accordingly to allow DHCP communication.
These troubleshooting steps should address common IP address assignment issues. If the problem persists, consult the documentation specific to your network equipment, operating system, or seek assistance from a network administrator or IT professional for further troubleshooting and support.
Assigning IP addresses is a fundamental aspect of network administration and plays a critical role in establishing connectivity and communication between devices. Whether it’s manual (static) assignment or dynamic assignment using DHCP, the ability to assign and manage IP addresses efficiently is essential for maintaining an organized and functional network.
In this article, we explored the basics of IP addresses, understanding their structure, and the different types available. We also discussed the two primary methods of IP address assignment: manual and automatic. Manual assignment provides control and stability for devices that require static IP addresses, while automatic assignment through DHCP offers convenience and efficient utilization of IP address resources.
We also covered how to assign IP addresses on different operating systems, including Windows, Mac, and Linux. Each operating system provides tools and interfaces to configure network settings and assign IP addresses, whether through a manual process or by utilizing DHCP.
In addition, we touched on troubleshooting techniques for addressing common IP address assignment issues. Verifying DHCP server availability, checking for IP address conflicts, and resetting network configurations are some of the troubleshooting steps discussed to ensure smooth IP address assignment.
Overall, IP address assignment is a fundamental component of network management. By understanding the different methods and addressing any issues that arise, network administrators and users can maintain reliable and efficient connectivity among devices within a network.
Whether you are setting up a small home network or managing a large enterprise network, the knowledge and techniques shared in this article provide a foundation for successful IP address assignment and network operation.
Leave a Reply Cancel reply
Your email address will not be published. Required fields are marked *
Save my name, email, and website in this browser for the next time I comment.
- Crowdfunding
- Cryptocurrency
- Digital Banking
- Digital Payments
- Investments
- Console Gaming
- Mobile Gaming
- VR/AR Gaming
- Gadget Usage
- Gaming Tips
- Online Safety
- Software Tutorials
- Tech Setup & Troubleshooting
- Buyer’s Guides
- Comparative Analysis
- Gadget Reviews
- Service Reviews
- Software Reviews
- Mobile Devices
- PCs & Laptops
- Smart Home Gadgets
- Content Creation Tools
- Digital Photography
- Video & Music Streaming
- Online Security
- Online Services
- Web Hosting
- WiFi & Ethernet
- Browsers & Extensions
- Communication Platforms
- Operating Systems
- Productivity Tools
- AI & Machine Learning
- Cybersecurity
- Emerging Tech
- IoT & Smart Devices
- Virtual & Augmented Reality
- Latest News
- AI Developments
- Fintech Updates
- Gaming News
- New Product Launches
New Step by Step Roadmap for Marijuana News
- Facts About Skycity Online Casino Nz 8211 100 Welcome Bonus Up To 100 Revealed
Related Post
The basic principles of online pokies real money nz ᐈ best slots to play (2024), top guidelines of play pokies online new zealand, related posts.

Your IP Has Been Banned: Possible Fixes and Workarounds

Who Owns IP Address

Why Would A Layer 2 Switch Need An IP Address

What Is /24 In IP Address

What Is IP Subnet

What Is My Private IP Address

What Are Private IP Addresses

How To Configure Ip Address For Ethernet
Recent stories.

Facts About Skycity Online Casino Nz – 100% Welcome Bonus Up To $100 Revealed

How to Find the Best Midjourney Alternative in 2024: A Guide to AI Anime Generators

How to Know When it’s the Right Time to Buy Bitcoin
Unleashing Young Geniuses: How Lingokids Makes Learning a Blast!
- Privacy Overview
- Strictly Necessary Cookies
This website uses cookies so that we can provide you with the best user experience possible. Cookie information is stored in your browser and performs functions such as recognising you when you return to our website and helping our team to understand which sections of the website you find most interesting and useful.
Strictly Necessary Cookie should be enabled at all times so that we can save your preferences for cookie settings.
If you disable this cookie, we will not be able to save your preferences. This means that every time you visit this website you will need to enable or disable cookies again.
How to fix “self-assigned IP address” issue on Mac
Key takeaways.
- The self-assigned IP address error occurs when your Mac assigns itself an IP address instead of getting one from the router.
- This usually happens due to network configuration issues, DHCP server problems, glitches in the firewall settings, unstable Wi-Fi connection, etc.
- To fix the “self-assigned IP address” error on your Mac, renew DHCP lease, restart your network devices , rejoin your Wi-Fi , or check your network settings .
Is your MacBook struggling to access the internet, though your Wi-Fi or Ethernet works fine? This can be due to the self-assigned IP address error on your Mac. Worry not!
Here, I’ll share how to fix the internet not working due to a self-assigned IP address error on your Mac to regain a stable network connection. But before we jump into the troubleshooting steps, let’s understand what a self-assigned IP error is.
What does “self-assigned IP address” mean on Mac?
The “self-assigned IP address” error on Mac refers to a situation where your device assigns an IP address and sets up an ad-hoc network instead of obtaining one from the network router or DHCP (Dynamic Host Configuration Protocol) server.
This self-assigned IP address is not legitimate or acknowledged on the network. That’s why your Mac cannot connect to the internet or other devices on the network, resulting in limited or no network connectivity.
This issue occurs due to several reasons such as:
- Network configuration conflicts
- DHCP server unavailability
- Problems with Mac’s network
- Unstable Wi-Fi connection
- Wrong Firewall settings
- Outdated macOS
But you can fix the issue with a few simple methods. Let’s learn them!
How to fix “self-assigned IP address” error on Mac
There are 12 ways to fix the problem, from simple checks to more advanced changes. It would help if you tried them in the order provided.
1. Check your connection
Before diving into Mac-specific settings, ensure that your router is functioning correctly and located near your Mac to obtain a valid IP address. Besides, if you are using an Ethernet connection, plug in the cable snugly.
I also check to validate that the cable has no fault and is in good condition. Moreover, If you are using an old Wi-Fi router, discard it and get a new one to obtain a smoother connection.
2. Reboot your network devices
Restarting both your modem and router can often resolve temporary network glitches. Power off the devices, unplug the cables, and wait a few seconds. It will help them cool down, as excessive heat can cause malfunctions.
After that, plug all cables, connect them to the power outlet, and turn them back on. In the meantime, restart your Mac once to iron out any bugs in macOS.
- Click the Apple logo .
3. Renew DHCP Lease on macOS
This method is effective when the assigned IP address may have expired or encountered conflicts. When you renew the DHCP Lease, your Mac requests a new IP address from the DHCP server. It ensures a valid configuration and resolves connectivity issues.
- Open the same TCP/IP tab window from Wi-Fi Details, as shown above.

After renewing the lease, check if you can connect to your network. If that doesn’t help, try creating a New Network Location and renewing the lease.
4. Rejoin your Wi-Fi network
Sometimes, simply forgetting and rejoining your Wi-Fi network can solve the self-assigned IP address error on your Mac.
- Turn off Wi-Fi for a few seconds and toggle it on.

5. Check your connection settings
Verify that your Mac’s network settings are configured correctly. You must opt for the appropriate network settings to obtain IP addresses and DNS information automatically.
- Go to your Wi-Fi Details . I have shown the steps above.
- Select TCP/IP from the left panel.

You may also try turning off the IPv6, as some users reported it conflicted with the IP address assigning procedure.
- Click on the drop-down arrow beside Configure IPv6 .

6. Reset your Network Preferences on Mac
Resetting the network preferences can help eliminate IP address misconfiguration, causing the internet to not work. So, you must delete specific network connectivity-related files from your MacBook.
- Launch Finder .

- Enter your Mac password to authenticate the deletion.
- Restart your Mac. It will automatically recreate the deleted files.
- Log in and connect to your Wi-Fi network.
- Go to the TCP/IP setting again and check the router files.
7. Create a new network location
Creating a new network location lets your Mac start fresh with network settings and eliminate a self-assigned IP address.
- Click the Apple logo → System Settings .
- Wait for a few seconds until your Mac connects to your Wi-Fi.
Repeat the steps of renewing the DHCP lease on your Mac, and then try connecting to your network.
When you try to perform configuration changes to the system, your Mac’s firewall experiences configuration issues. Let’s fix this problem by resetting the Firewall.
8. Reset the Firewall on your Mac
- In the menu bar, click Go → Go to Folder .

- Restart your Mac.
After your system boots, it’ll ask you to allow access to numerous programs and services. Enable access depending upon your choice. Then, try connecting to your network and check if the self-assigned IP address error persists.
If you are unsure about deleting the Firewall files, you may temporarily disable it. Toggling off the Firewall on your Mac can help determine if it’s causing conflicts with network connectivity.
- Select Network from the left panel → Choose Firewall .

- Restart your Mac and turn it on again.
9. Set Service Order from Mac’s network settings
Adjusting the service order can prioritize the network interface, ensuring your Mac connects to your preferred network.
- Click the Apple logo → System Settings → Network .

10. Change DNS Servers on macOS
Discarding existing DNS and switching to alternative DNS servers can resolve DNS-related issues that may contribute to the self-assigned IP address error.
- Open System Settings → Wi-Fi → Click Details beside your Wi-Fi name.

- Add these numbers: 8.8.8.8 8.8.4.4 1.1.1.1 9.9.9.9

11. Check for conflicting IP address
Ensure that no other devices on your network use the same IP address as your Mac. Check your router’s DHCP client list and verify that all devices have unique IP addresses assigned.
12. Disable VPN
If you have a VPN service enabled, disable it temporarily to see if it resolves the self-assigned IP address error. Open your Mac’s VPN settings and turn off the VPN connection.
Bonus fixes
You may need to attempt more complex fixes if the troubleshooting techniques outlined above do not fix the self-assigned IP address problem on your Mac:
- Update your Mac to the latest OS version.
- Verify your Mac is not infected with any malware or viruses.
- Ensure your network devices are operating well and there are no hardware problems.
- Restart your router or modem
- Reset NVRAM or PRAM on Mac to clear up the system settings memory.
Tips to prevent self-assigned IP address issues on Mac
Self-assigned IP address error is indeed frustrating as it prevents your Mac from accessing the internet. So, you must take some precautions to avoid such a nuisance in the future.
- Regularly update your Mac
- Try to restart your Mac, router, or other network devices once in a while
- If your router or modem is outdated, replace it with a new one to get optimal performance. Also, configure the network with high-quality equipment.
- Connect your Mac to only one active network. I suggest using an ethernet cable for a stable connection.
- Don’t connect too many devices to your Wi-Fi at a time, as it may create network overcrowding.
Get back your smooth internet access!
Encountering a self-assigned IP address error on your Mac hampers your work, so you should address it ASAP. You can tackle the issue and restore a stable and reliable network connection using these troubleshooting techniques.
If the problem isn’t resolved, contact Apple Support and seek assistance.
Explore more…
- MacBook connects to Wi-Fi but has no Internet? 12 Fixes
- Wi-Fi not working on Mac? 10 Ways to fix!
- How to Run Wi-Fi Diagnostics on Mac for Better Network Connections
- How to fix IP address conflict on Mac: Simple solutions to fix it!
🗣️ Readers like you help support iGeeksBlog. When you make a purchase using links on our site, we may earn an affiliate commission. Read Disclaimer .

Leave a Reply Cancel reply
Your email address will not be published. Required fields are marked *
Save my name, email, and website in this browser for the next time I comment.
How-To Geek
How to assign a static ip address in windows 10 or windows 11.
When organizing your home network it's easier to assign each computer it's own IP address than using DHCP. Here we will take a look at doing it in XP,
Quick Links
What is a static ip address, assign static ip addresses via your router, how to set a static ip address in windows 11, how to set a static ip address in windows 10, how to set a static ip address in windows 7 or 8 using "network connections", set a static ip address in windows vista, set a static ip address in windows xp, key takeaways.
- To set a static IP address in Windows 10 or 11, open Settings -> Network & Internet and click Properties for your active network.
- Choose the "Edit" button next to IP assignment and change the type to Manual.
- Flip the IPv4 switch to "On", fill out your static IP details, and click Save.
Sometimes, it's better to assign a PC its own IP address rather than letting your router assign one automatically. Join us as we take a look at assigning a static IP address in Windows.
A static IP address is manually set to a permanent, fixed address rather than being assigned automatically by your router using a procotol known as Dynamic Host Configuration Protocol (DHCP). DHCP is a handy way for devices to connect to your network more easily, because you don't have to configure IP addressing for each new device yourself. The downside to automatic addressing is that it's possible for a device's IP address to change from time to time, which is why people choose static IPs for certain types of devices. For example:
- You have a device like a home media server that you want to be able to find using the same IP address or host name each time.
- You have certain apps that can only connect to network devices using their IP address. In particular, many older networking apps suffer this limitation.
- You forward ports through your router to devices on your network. Some routers play nice with port forwarding and dynamic IP addresses; others do not.
Whatever your reason, assigning static IP addresses to devices is not difficult, but you do have a choice to make---whether to do it from the router or on the device itself.
Related: How to Set a Static IP Address in Ubuntu
While this article covers assigning static IP addresses to PCs within Windows itself, there is another way to go about it. Many routers allow you to assign a pool of IP addresses that are handed out to specific devices (based on the device's physical, or MAC address). This method offers a couple of significant advantages:
- IP addresses are still managed by the router, meaning that you won't have to make (and keep up with) changes on each individual device.
- It's easier to assign addresses within the same IP address pool your router uses.
This article is about assigning static IP addresses directly to PCs running Windows. We've already got a great guide on How to Set Static IP Addresses On Your Router , so if that's the way you want to go, be sure to give it a read.
With all that in mind, though, let's take a look at how to assign static IP addresses within any version of Windows.
Related: How to Find Your Router's IP Address on Any Computer, Smartphone, or Tablet
To set a static IP address in Windows 11, you'll want to open Settings, go to Network & Internet, and then find the Properties for your network. Inside there you'll be able to click the Edit button for IP Assignment and then fill out the manual network details.
First, open up the Settings app and then find Network & Internet on the left-hand side. You'll be presented with a panel that shows your current network connection. You can click where it says "Properties" right underneath the network, or if you have multiple network connections you can drill down into the specific network to see the IP address details for each one . In this case it's called "Ethernet", but you will most likely see "Wi-Fi" as the option to choose.
Once you've drilled down into the network connection that you want to set a manual IP for, scroll down until you see "IP Assignment" and then click the Edit button to the right.
Once there, you'll flip the drop-down to "Manual" and switch the IPv4 switch to "On". At this point you can fill out your network details and click Save to finish.
You can also use the old-school Network Connections panel in Windows 11, so if you prefer to use that method, keep reading.
If you're interested in more advanced networking, you might need to set up a static TCP/IP route , reset the entire TCP/IP stack on Windows , check open TCP/IP ports , find your MAC address on Windows , or find your IP address from the Command Prompt . We've got you covered there too.
To set a static IP address in Windows 10, you'll need to open the Settings app and drill down to Network & Internet. From there you'll select Properties for your network, and then the Edit button next to IP Assignment where you can input a manual IP address.
First, open the Settings app and locate the Network & Internet button.
On the next screen you'll see your network status, which should show you your active network. Here you'll want to click the Properties button. If you have multiple different networks, you could select them from the left-hand menu---in our case you'll notice we have both Wi-Fi and Ethernet networks, so you'll want to pick the one that you are trying to set a manual IP address for. You'll notice this is the same method we use when we're trying to find an IP address on Windows 10 .
On the network properties screen, scroll down until you see "IP settings" and click the Edit button under "IP assignment".
In the resulting popup window, change the Edit IP settings dropdown to Manual and then flip the IPv4 switch to "On". Fill out the details, click Save, and you should be good to go.
You might need to reboot to get all of your applications to work properly, just because it's Windows.
It's worth noting that you can use the old Network Connections method to set an IP address in any version of Windows, so if you prefer that method, keep reading.
To change the computer's IP address in Windows 7, you'll need to open the "Network Connections" window. Hit Windows+R, type "ncpa.cpl" into the Run box, and then hit Enter.
In the "Network Connections" window, right-click the adapter for which you want to set a static IP address, and then select the "Properties" command.
In the properties window for the adapter, select "Internet Protocol Version 4 (TCP/IPv4)" and then click the "Properties" button.
Select the "Use the following IP address" option, and then type in the IP address, subnet mask, and default gateway that corresponds with your network setup. Next, type in your preferred and alternate DNS server addresses. Finally, select the "Validate settings upon exit" option so that Windows immediately checks your new IP address and corresponding information to ensure that it works. When you're ready, click the "OK" button.
And then close out of the network adapter's properties window.
Windows automatically runs network diagnostics to verify that the connection is good. If there are problems, Windows will give you the option of running the Network troubleshooting wizard. However, if you do run into trouble, the wizard likely won't do you too much good. It's better to check that your settings are valid and try again.
Changing your IP from DHCP to a Static address in Vista is similar to other versions of Windows, but getting to the correct location is a bit different. Open the Start Menu, right-click on Network, and select Properties.
The Network and Sharing Center opens...click on Manage network connections.
Right-click on the network adapter you want to assign an IP address and click Properties.
Highlight Internet Protocol Version 4 (TCP/IPv4) then click the Properties button.
Now change the IP, Subnet mask, Default Gateway, and DNS Server Addresses. When you're finished click OK.
You'll need to close out of Local Area Connection Properties for the settings to go into effect.
Open the Command Prompt and use the
command to verify that the changes were successful.
To set a Static IP in Windows XP, right-click the "My Network Places" icon, and then select "Properties."
Right-click the adapter for which you want to set the IP, and then select "Properties" from the context menu.
Select the "Internet Protocol (TCP/IP)" entry, and then click the "Properties" button.
Select the "Use the following IP address" option. Type in the IP address, subnet mask, default gateway, and DNS server addresses you want to use. When you're finished, click the "OK" button.
You will need to close out of the adapter's properties window before the changes go into effect.
And you can verify your new settings by using the
command at the command prompt.
By and large, it's better to let most of your devices have their IP addresses assigned automatically by your router. Occasionally, though, you might want to set a static IP address for a particular device. While you can set static IP addresses directly on your devices (and this article has shown you how to do just that on Windows PCs), we still recommending setting up static IP addressing on your router if possible. It will just make life easier.
Related: How to Find Any Device's IP Address, MAC Address, and Other Network Connection Details
[Wireless Router] How to manually assign IP around the DHCP list?
Send the page link to your email
Please enter your email
Scan QR code to open this page with your smart phone.
In general, the device connected to ASUS router will receive a dynamic private IP address from router DHCP server, like 192.168.1.3. However, if you want to share files in a computer to other devices, then you might need a manual assign IP function to set a static IP for the computer so you don't need to search and confirm the IP address of the computer every time when you want to access it.
To assign a fixed IP address for your devices, you may follow the steps below.
Method1 : You can assign a fixed IP address from your device's network card. (For how to configure the built-in network card of your device, please contact the device manufacturer.)
Method2: Set up a fixed IP for device via ASUS router DHCP server.
Step1 . Connect your computer to ASUS router via Wi-Fi or Ethernet cable.
Note : Wired connection is recommend to avoid setup interruptions due to unstable wireless network signals
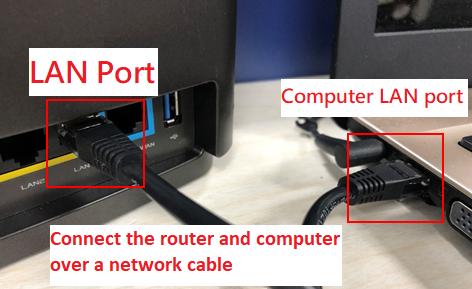
Step2: Open a web browser and navigate to Web GUI. http://www.asusrouter.com
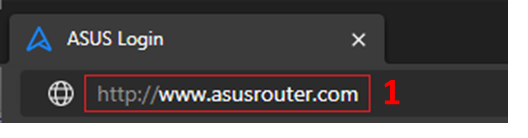
Step3: Enter your login username and password on the login page and then click [ Sign In ].
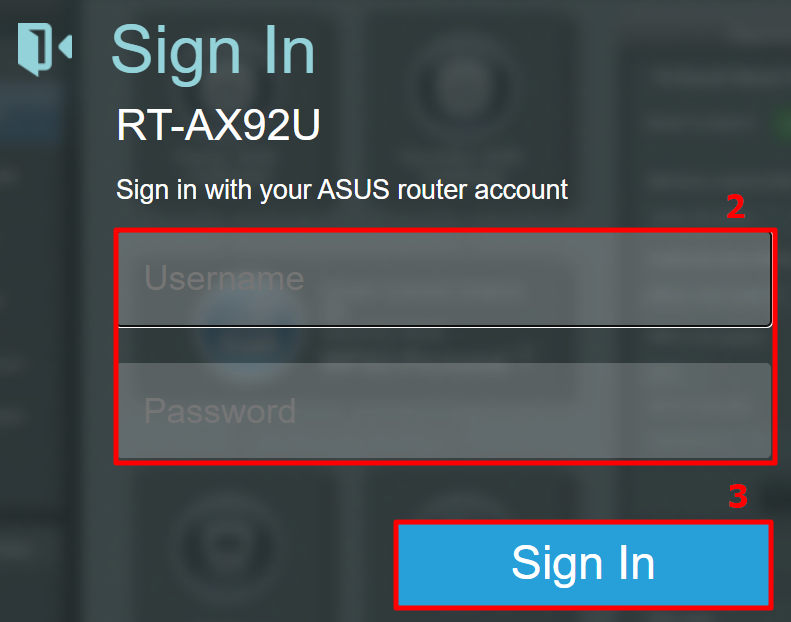
Note: If you forget the user name and/or password, please restore the router to the factory default status and setup. (The default username and password is admin/admin).
Please refer to [Wireless Router] How to reset the router to factory default setting? for how to restore the router to default status.
Step 4 : Go to [ Advanced Settings ] > [ LAN ] > [ DHCP server ], you can find the IP address range of RT-AX92U is 192.168.50.2 ~ 192.168.50.254.
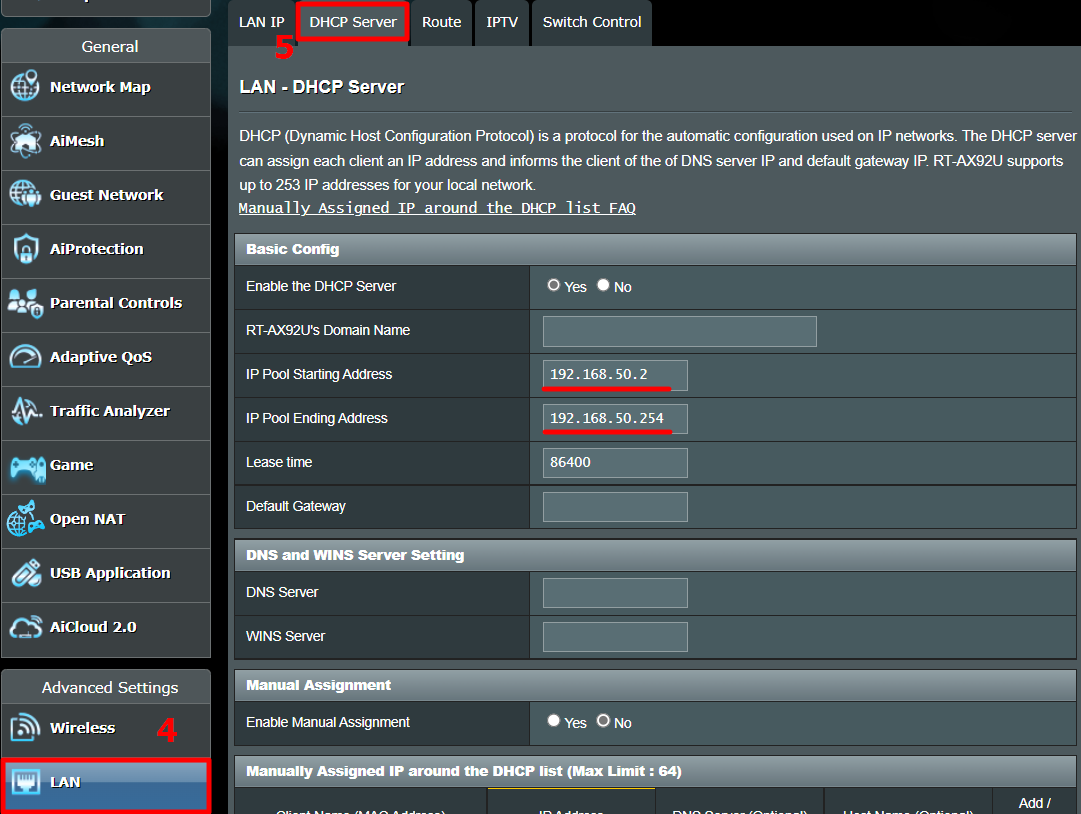
Step5: Find [Enable Manual Assignment] and click [Yes] to enable manual assign function.
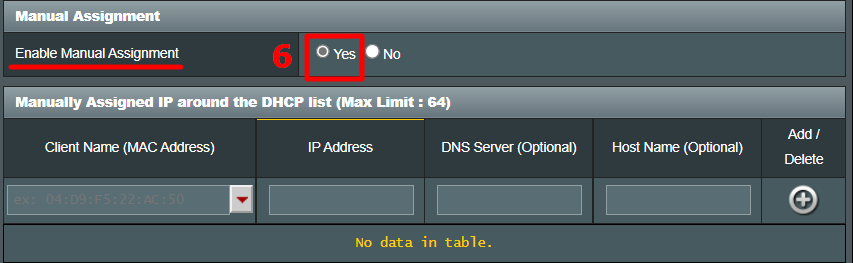
Step6: In Manually Assigned IP area, please fill in the device MAC address and the IP address binding to this device only.
Client Name (MAC Address) :Use the dropdown list to choose the device or manual enter the device's MAC address.
IP address :Enter the IP address that you want to bind to this device. Please make sure the IP address needs to be in the IP pool of your DHCP server.
For example, if the IP pool of your router’s DHCP server is 192.168.50.2~192.168.50.254, you should enter an IP address within this range, like 192.168.50.75.
DNS server (Optional) :Default is blank. You can enter the preferred DNS server if needed.
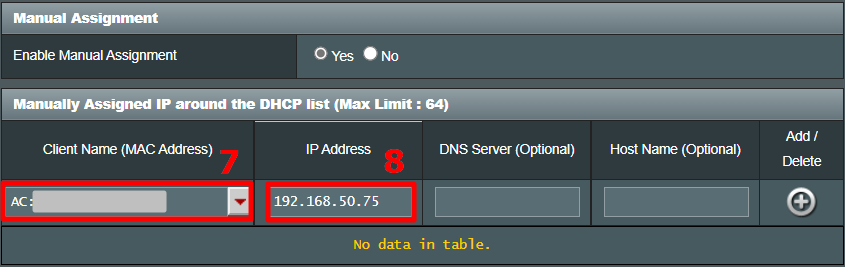
Step7: Click the "+" icon and the [Apply] button to complete the setting.
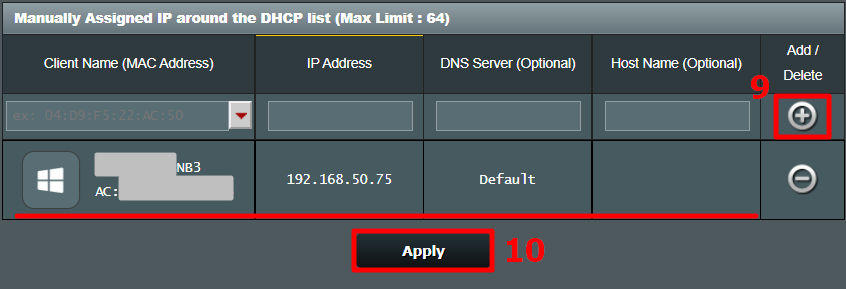
Step8: You will be direct to DHCP page if the setting is completed. Please make sure the rule you just set does show up in the manual assign IP list and MAC address/IP address are correct.
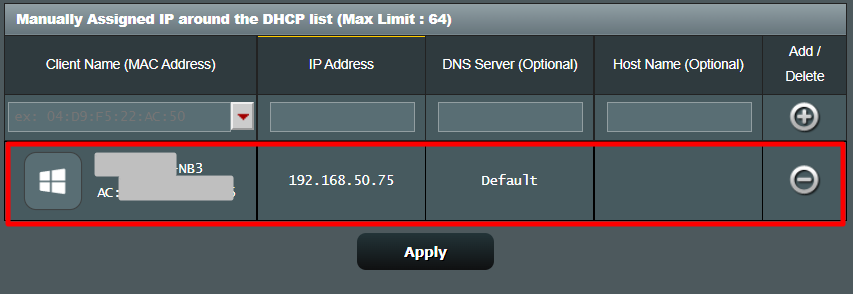
1. What is DHCP server?
A DHCP (Dynamic Host Configuration Protocol) server in ASUS router can provide user's devices a private IP address, Subnet mask, Default gateway, DNS server that user does not need to manual assign IP for devices.
2. Why can't I manual assign IP to my device successfully after following the steps?
a. Please make sure you've set and apply the rule successfully and you can see the rule show up in the manual assign IP list.
b. Please make sure the device MAC address is correct. c. Please make sure your device's network card is set to obtain IP automatically. d. Please upgrade your router to latest firmware and reset your router to default status and try again from Step1.
For how to do firmware upgrade, please refer to: [Wireless] How to update the firmware of your router to the latest version ?
For how to reset router, please refer to: [Wireless Router] How to reset the router to factory default setting?
3. Can I change to the IP address after rule is set?
No. If you want to assign a different IP address for same device, you need to click the delete button to remove this rule and apply the setting first then back to Step4 to set a new rule again.
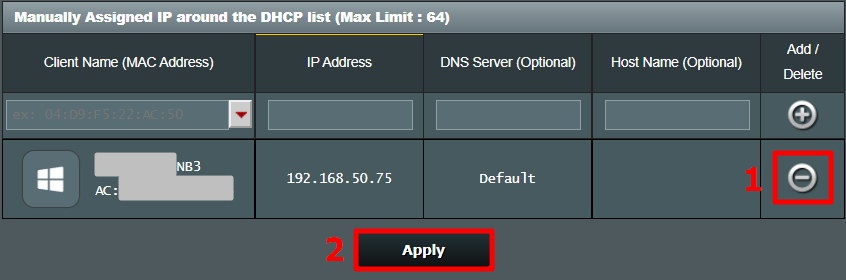
How to get the (Utility / Firmware)?
You can download the latest drivers, software, firmware and user manuals in the ASUS Download Center .
If you need more information about the ASUS Download Center , please refer this link .
Was this information helpful?
What we can do to improve the article?
- Above information might be partly or entirely quoted from exterior websites or sources. please refer to the information based on the source that we noted. Please directly contact or inquire the sources if there is any further question and note that ASUS is neither relevant nor responsible for its content/service
- This information may not suitable for all the products from the same category/series. Some of the screen shots and operations could be different from the software versions.
- ASUS provides the above information for reference only. If you have any questions about the content, please contact the above product vendor directly. Please note that ASUS is not responsible for the content or service provided by the above product vendor.
- Brand and product names mentioned are trademarks of their respective companies.
Stack Exchange Network
Stack Exchange network consists of 183 Q&A communities including Stack Overflow , the largest, most trusted online community for developers to learn, share their knowledge, and build their careers.
Q&A for work
Connect and share knowledge within a single location that is structured and easy to search.
How do I assign IPv6 addresses manually?
So I'm still rather clueless with IPv6, but I wanted to try something with my network today. Currently, I assign IPv4 LAN addresses manually, so that my router is 192.168.0.1 , then my first computer is 192.168.0.2 , and so on.
So far, I haven't been able to figure out how to do this with IPv6. Or is the process completely different that this is not how it would work?
Router is an Archer C4000, and my main system runs Ubuntu 19.04
EDIT: To clarify with how I manually set network IP addresses, my router has a page where I can set an address of my choosing to a MAC address. No configuration is done outside of the router.
- Please edit question and indicate how you assign LAN addesses manually. (On the router only? On your first computer as well?) I suspect you just set a network range on the router, and then addresses are not assigned "manually", but by DHCP from the router. On IPv6 then your router needs to advertise a subnet. On Ubuntu, you can set both IPv4 and IPv6 address manually with ip addr add ... . – dirkt Sep 10, 2019 at 11:22
- Edited. I'm going to guess then that it is assigned from a range, but then I limit what can be assigned based on MAC addresses. If I'm setting the IP address manually on each device, is there any further configuration that needs to be done (apart from avoiding duplicates), or will the router just accept that device A is going to use its own configured address? – hiigaran Sep 10, 2019 at 12:00
- If there's a page where you can assign an IPv4 address based on a MAC address, then this is for static addresses assigned via DHCP from the router. IPv6 works differently. While there is DHCPv6, the normal way is to use SLAAC , and let each computer pick an IPv6 address based on the announced subnet prefix.So this page won't help you to assign IPv6 addresses... – dirkt Sep 10, 2019 at 12:05
2 Answers 2
To clarify with how I manually set network IP addresses, my router has a page where I can set an address of my choosing to a MAC address. No configuration is done outside of the router
This usually isn't called "manual configuration" to avoid confusion (from the LAN hosts' point of view, it is still automatic configuration). The usual terms are "static DHCP lease" or "DHCP reservation".
Overall, the process in IPv6 is usually completely different.
In IPv6 primary address auto-configuration mechanism (SLAAC) is completely stateless: the router does not issue individual addresses; it only periodically advertises the subnet address prefix and each host just combines it with its own chosen suffix. The router cannot limit hosts to just a specific sub-range; in fact the router does not receive any feedback about hosts' chosen address at all.
(Depending on each device's OS, the suffix might be a MAC address in traditional RFC4862 SLAAC; it might be a static hash value in RFC7217; it might be completely random in RFC4941 "Privacy Extensions"; and it might even be a user-provided value if the OS allows that.)
For example, the router advertises 2001:db8:123:456::/64 as the LAN address prefix; client A combines it with its own MAC address and begins using 2001:db8:123:456:6af2:68fe:ff7c:e25c .
That said, DHCP does exist in the IPv6 world and handles address leases in much the same way as IPv4 DHCP does. That means you can create DHCPv6 address pools, you can configure static address leases in DHCPv6, and so on. But not all clients support DHCPv6 at all (e.g. Android does not), so having SLAAC alongside is almost unavoidable.
So if you have a DHCPv6-capable client on a DHCPv6-capable network, chances are it'll have both a nice DHCPv6-assigned address and a longer SLAAC-autoconfigured address.
If I'm setting the IP address manually on each device, is there any further configuration that needs to be done (apart from avoiding duplicates), or will the router just accept that device A is going to use its own configured address?
As you can see above, that's how IPv6 address configuration works anyway .
Your router's manual is found in User Guide and contains for IPv6 only an option for entering a static IPv6 address for the router itself (as received from the ISP).
The section about specifying the IP addresses that the router assigns by MAC address does not say whether they are IPv4 or IPv6, but I think it is highly unlikely that this will work for IPv6. And here is why.
IPv6 is quite unlike IPv4 in the sense that the long IPv6 address is made up of two parts. The first (the prefix) is assigned by the ISP. The second is assigned locally by the router or by each computer and is usually a random value based on the MAC address.
This means that the router does not control the IPv6 prefix which the ISP can change whenever it likes. You can force your computer to use a static IPv6 address, but only if it agrees with the ISP. You may be able to ask the ISP for a static IPv6 address, but that is a bad idea.
The reason it's a bad idea, is that all your devices are visible to the entire Internet by their IPv6 address (unless the router intervenes). Therefore having a fixed IPv6 address just makes tracking you that much easier.
If you wish, you would in Windows set a computer's static IPv6 inside Start > Network > Network and Sharing Center > Change Adapter Setting , right-click on the Ethernet connection IPv6 and choose Properties, right-click "Internet Protocol Version 6 (TCP/IPv6)" and click on Properties, the set "Use the following IPv6 address".
But the fact you can does not mean you should. The only place that static IPv6 addresses makes sense is inside a local network which is not connected to the Internet.
- What about if I wanted to run a web server? I'm constantly traveling for work, and I would love to have access to one of the computers at home which runs 24/7. I'd need to set a static IPv6 for this to work, wouldn't I? – hiigaran Sep 10, 2019 at 19:23
- A general solution would require an IPv6 dynamic DNS provider. See for that the article dynv6.com: IPv6 dynamic DNS done right . – harrymc Sep 10, 2019 at 19:29
- @harrymc Help me understand your logic, why would a server in a data center have a static IP but a server at home a dynamic one? In what world does that make any sense? – Chazy Chaz Jul 29, 2022 at 12:40
- In a world where the ISP attributes to users dynamic IP addresses. – harrymc Jul 29, 2022 at 12:51
You must log in to answer this question.
Not the answer you're looking for browse other questions tagged networking router ipv6 ..
- The Overflow Blog
- Controlling cloud costs: Where to start, and where to go from there sponsored post
- Will antitrust suits benefit developers?
- Featured on Meta
- New Focus Styles & Updated Styling for Button Groups
- Upcoming initiatives on Stack Overflow and across the Stack Exchange network
- Google Cloud will be Sponsoring Super User SE
Hot Network Questions
- Exercises worth points and ethics
- Genesis 3:21, how it seems everybody agree that the "skin" is an animal skin which is killed by God?
- Help identifying this blue part
- Does the "sniper analogy" undermine the Anthropic Principle objection to the fine-tuning argument for God's existence?
- Pronounciation websites and pronounciation of haricot
- Union of two events is at least as likely as the product of the events' probabilities
- 2 Thessalonians 2:8-9 - After/According to OR Against the Working of Satan?
- Global character of ABC/Szpiro inequalities
- A ship full of aliens are stranded on Earth. Some Earth people take them in and hide them. They write a fictional kids TV show based on the aliens
- oldest free assembler targeting the 386 CPU
- How do I motivate my PhD students to attend seminars
- Direct flight emits more CO2 than flight with layover?
- With the recent security issue with xz, what should we do before using HomeBrew again?
- how could March 30th 2024. be followed by the 1st?
- Train from Verona to Bolzano with bicycles (4 people)
- Capacitor connected with a DC source
- The governor's birthday puzzle
- Are "I have already finished since 8 am" and "I finished since 8 am" correct?
- Medieval fantasy movie where a sorceress disguises herself as the queen to have a child by the king
- Simplest way to isolate MOSFET from MCU
- Rockstar Poetic Number Literals!
- Generate Rig from vertecies
- Would strengthening Foundation and Choice in NBG, make it equi-consistent with MK?
- Can "albeit" ever be followed by a complete sentence
- Search forums
- Wireless Networking
- ASUS Wireless
Manually assigned IP address
- Thread starter Alfred E. Neuman
- Start date Jan 30, 2021
SNBForums Code of Conduct
SNBForums is a community for everyone , no matter what their level of experience.
Please be tolerant and patient of others, especially newcomers. We are all here to share and learn!
The rules are simple: Be patient, be nice, be helpful or be gone!
Alfred E. Neuman
Occasional visitor.
- Jan 30, 2021
Asus AC86U: in configuring a static IP address for network devices I'm confused on using Manually Assigned IP's or MAC and IP Binding. I've searched and found a few articles, but I'm still in doubt as to which would be most effective. I have an IP camera NVR and a couple of other devices that need a static IP. It appears that some assign static IP's to just about everything on their network so they can detect any unwanted issues or intrusions. Is this really that convenient?
ColinTaylor
Part of the furniture.
Alfred E. Neuman said: I have an IP camera NVR and a couple of other devices that need a static IP. Click to expand...

Alfred E. Neuman said: Asus AC86U: in configuring a static IP address for network devices I'm confused on using Manually Assigned IP's or MAC and IP Binding. I've searched and found a few articles, but I'm still in doubt as to which would be most effective. I have an IP camera NVR and a couple of other devices that need a static IP. It appears that some assign static IP's to just about everything on their network so they can detect any unwanted issues or intrusions. Is this really that convenient? Click to expand...
I'm also letting the DHCP assign IPs but I have limited the range of that pool, with the intent of establishing a smaller pool dedicated for static addresses. As I understand it, I can let the router assign an IP inside the DHCP range, then make that address static by turning on the MAC and IP Address Binding feature. This means I have a static address within the DHCP server pool. Or, I can use the Manually Assign IP setting and assign a device an IP address of my choice outside the DHCP IP poo, making it static. Is there a benefit of using either of these choices?
Alfred E. Neuman said: Is there a benefit of using either of these choices? Click to expand...

Very Senior Member
Or both. For devices (servers, nas, etc) that I really want to ensure end up with a specific ip no matter what, I configure the device with a static ip *and* assign them the same ip based on their mac in the dhcp reservation table. If for some reason, such as a reset or FW update of the device, and it defaults back to dhcp from its configured static ip, then it will still end up with the expected ip. I prefer static IPs for "infrastructure" so they can function with or without a dhcp server or router running. Some specific clients get assigned specific IPs for vpn routing purposes. General client devices though, may as well us a general dhcp pool for them.

- Jan 31, 2021
dosborne said: For devices (servers, nas, etc) that I really want to ensure end up with a specific ip no matter what, I configure the device with a static ip *and* assign them the same ip based on their mac in the dhcp reservation table. If for some reason, such as a reset or FW update of the device, and it defaults back to dhcp from its configured static ip, then it will still end up with the expected ip. Click to expand...
Thanks for the replys. I have found something interesting on the AC86U that I did not know, but I'm a beginner at this so it may be old stuff. It does appear there are two methods of creating a static device IP address, and that was the reason for my OP. I found you can use MAC and Address Binding (under Network Map tab) to make any DHCP issued address permanent and "static" (within the DHCP pool). However, if you use the other option (under LAN>DHCP Server>Manually assigned IP), which is to manually assign a IP address to a device (outside the DHCP pool) it creates a static address, and also turns on the MAC and Address Binding switch for that device! So..........not that I fully understand this, but option # 2 is the "belt and suspenders" approach as mentioned.
I use Manually Assigned IPs for anything I access from a bookmark in my browser... e.g., printer, NAS, cell phone.

New Around Here
- Feb 1, 2021
wmmallette47
Regular contributor.
- Feb 14, 2021
azbruno said: I use Manually Assigned IPs for anything I access from a bookmark in my browser... e.g., printer, NAS, cell phone. Click to expand...
wmmallette47 said: Can you expand on this? So on a particular device (an iPhone), I can manually assign an IP to different activities I do with that device? Click to expand...
wmmallette47 said: So on a particular device (an iPhone), I can manually assign an IP to different activities I do with that device? Click to expand...
Do these assigned IPs translate into what an app or website sees as that client‘s IP when surfing the web, shopping on Amazon or reading Twitter/Facebook? For instance, if I log into Twitter from my phone versus my iPad, will Twitter see the IP that I assign on my network or is that a different thing altogether. And that then leads me to ask about VPN for privacy reasons when I don’t want my true IP visible by Facebook or Amazon, etc.
buildersboy
I'm OCD. My IP range has no more space than total devices in the house. All IP's reserved in neat order.
wmmallette47 said: Do these assigned IPs translate into what an app or website sees as that client‘s IP when surfing the web, shopping on Amazon or reading Twitter/Facebook? For instance, if I log into Twitter from my phone versus my iPad, will Twitter see the IP that I assign on my network or is that a different thing altogether. Click to expand...
ColinTaylor said: No. These are private addresses used within your local network. External sites will see your router's WAN IP address (for all clients). Of course sites like Amazon can still identify individual clients by other methods like browser cookies and other unique information. Click to expand...
wmmallette47 said: Thanks for that information. Makes sense. How do I defeat Amazon’s (etc.) identification of me? Click to expand...
wmmallette47 said: How do I defeat Amazon’s (etc.) identification of me? Click to expand...
Similar threads
- Dec 29, 2023
- Asuswrt-Merlin
- Lee MacMillan
- Dec 3, 2023
- Dec 6, 2023
- ASUS AX Routers & Adapters (Wi-Fi 6/6e)
- Jan 11, 2024
- ASUS AC Routers & Adapters (Wi-Fi 5)
- Sep 21, 2023
- Started by AndrewL733
- Nov 16, 2023
- Replies: 13
- Started by BeachGuy
- Oct 19, 2023
- Started by BradMcA
- Jul 24, 2023
Latest threads
- Started by ppw7216
- Yesterday at 3:22 PM
- Started by madifor
- Yesterday at 3:18 PM
- Started by visortgw
- Yesterday at 2:24 PM
- Started by zombeeh8er
- Yesterday at 1:29 PM
- Replies: 14
- Started by ShrimpySkimp78
- Yesterday at 1:05 PM
Sign Up For SNBForums Daily Digest
Members online.
- le_communiste
Welcome To SNBForums
SNBForums is a community for anyone who wants to learn about or discuss the latest in wireless routers, network storage and the ins and outs of building and maintaining a small network.
If you'd like to post a question, simply register and have at it!
While you're at it, please check out SmallNetBuilder for product reviews and our famous Router Charts , Ranker and plenty more!
- This site uses cookies to help personalise content, tailor your experience and to keep you logged in if you register. By continuing to use this site, you are consenting to our use of cookies. Accept Learn more…
Resolving virtual machine IP address conflict issues (1008177)
- The system has detected a conflict for IP address
- There is an IP address conflict with another system on the network
- The static IP address that was just configured is already in use on the network. Please reconfigure a different IP address
Resolving IP address conflicts
- For network environments with statically assigned IP addresses, ensure each local host is configured with a unique IP address. If your computer has a dynamically assigned address, releasing and renewing its IP address can workaround IP address conflicts.
- Clear the ARP table of the LAN switch
Assign a new IP address that has never been used if that option is available. First ping test the IP address before assigning it to confirm its availability.
Resolving TCP/IP stack issues on the virtual machine
To resolve TCP/IP stack issues on the virtual machine:
- Remove and reinstall your virtual network adapter driver.
Verify, using the vSphere/ VI Client, that the ethernet adapter is connected and powered:
Enable and disable the NIC and ping test.
Uninstall VMware Tools and ping test.
Connect to host using the vSphere/ VI Client.
Turn off the virtual machine.
Remove the ethernet adapter.
Turn on the virtual machine. TCP/IP is not loaded.
Turn off the virtual machine again.
Add the ethernet adapter – at this point either auto assign a MAC or manually assign one.
Assign a different IP address to eliminate the possibility of duplicate IP and do a ping test.
Reinstall VMware Tools and do a ping test.
For related information, see Verifying virtual network adapter is present and connected to the virtual machine (1003786) .
If there is a problems with assigning the IP address to the Virtual network adapter please see the following article Networking Error, IP Address Already Assigned to Another Adapter (1179) .
Como solucionar problemas de conflito de endereço IP em máquinas virtuais Resolución de problemas de conflictos de direcciones IP de máquinas virtuales 解决虚拟机 IP 地址冲突问题 仮想マシンの IP アドレスの競合問題を解決する
- VMware vSphere ESXi
- VMware VirtualCenter
- VMware vCenter Server
- VMware ESX Server
- VMware VirtualCenter 2.5.x
- VMware VirtualCenter 2.0.x
- VMware vCenter Server 4.1.x
- VMware vCenter Server 4.0.x
- VMware ESXi 4.1.x Installable
- VMware ESXi 4.1.x Embedded
- VMware ESXi 4.0.x Installable
- VMware ESXi 4.0.x Embedded
- VMware ESXi 3.5.x Installable
- VMware ESXi 3.5.x Embedded
- VMware ESX Server 3.5.x
- VMware ESX Server 3.0.x
- VMware ESX 4.1.x
- VMware ESX 4.0.x
IMAGES
VIDEO
COMMENTS
On your Mac, choose Apple menu > System Settings, then click Network in the sidebar. (You may need to scroll down.) Click the network connection you want to use on the right, then click Details. Click TCP/IP. If your address is assigned automatically, choose Using DHCP. If your ISP or administrator gave you an IP address, choose Manually, then ...
You'll need to select a new IP address from within the private IP address range listed. More on that in a minute. Click Advanced. Select TCP/IP. The window shown below appears. From the Configure IPv4 menu, select Manually. Enter a static IP address in the IPv4 Address field.
Enter "arp -s <IP address> <MAC address>" and press the [ENTER] key. <IP address> Enter the IP address to assign to the machine. <MAC address> Enter the MAC address of the machine with separation at every two digits by a hyphen "-." MAC Address. Example: arp -s 192.168.1.45 00-1E-8F-46-80-2e. 3.
6. Click the TCP/IP tab. Depending on your version of macOS, you'll see this either at the left side or the top of the window. 7. Select Manually from the dropdown menu next to Configure IPv4. Alternately, you can click on "Renew DHCP Lease" to have your computer automatically generate a new IP address for you.
Step 6: Configure IP Adress. Click the drop-down menu labeled "Configure IPv4." Select "Manually." The values for IPv4 Address, Subnet Mask and Router will be editable. Enter your desired values for the IP address and click the OK button when you are done.
USB 10/100/1000 LAN. Wi-Fi. Bluetooth PAN. Thunderbolt Bridge. Then use the desired service name in the following command: networksetup -setmanual SERVICE IP SUBNET ROUTER. For example, to change the IP address of my Wi-Fi interface, I would use a command like this: networksetup -setmanual Wi-Fi 192.168.1.2 255.255.255. 192.168.1.1.
To change the IP, click the " IP Address " field ( 1.) and type in the static IP address you want your Mac to utilise. Please note that you can't set an IP that would be out of the range your router is configured to hand out. Once done, you can click the " OK " button ( 2.) to confirm your changes. 9.
To change your Mac's IP address, head back to the same Network menu mentioned above. On the window where you confirmed your Mac's IP address, click the TCP/IP menu on the left. This shows more details about your Mac's current network connection. Next to Configure IPv4, you'll probably see Using DHCP. DHCP, or Dynamic Host Configuration Protocol ...
You will need to go to Edit Locations... with in the Network Preference Pane. Name it something that will let you remember what it is for. Once you have named the new location you will click on the connection you want to set manually. In this example we will use Ethernet. From the Configure IPv4 drop down we will choose Manually.
Setting a Manual Static IP Address in OS X. Launch System Preferences from the Apple menu. Click on "Network". Click on the protocol you are using, let's say we're using Wi-Fi with a wireless connection so click on "Wi-Fi" so that the network interface is selected, and then click on the "Advanced" button in the lower right ...
Setting a Manual IP Address on Mac. Launch 'System Preferences' from the Apple menu (or Spotlight) Click on the "Network" icon. In the lower right, click on the 'Advanced' button. In the pulldown menu next to "Configure IPv4" select "Manually" (or DHCP with manual address, if that's what you need) Fill in the IP address ...
Launch ' System Preferences ' from the Apple menu (or Spotlight) Click on the " Network " icon. In the lower right, click on the ' Advanced ' button. In the pulldown menu next to "Configure IPv4" select "Manually" (or DHCP with manual address, if that's what you need) Fill in the IP address, subnet mask, and router, as ...
Navigate to the DHCP settings section or a similar option related to network configuration. 4. Look for an option to " Release " or " Renew " the DHCP lease. Click on this option to acquire a new IP address from the router. 5. Save the changes and restart your Mac to apply the new IP address.
To manually assign an IP address on a Mac, follow these steps: Click on the Apple menu in the top-left corner of the screen and select "System Preferences.". In the System Preferences window, click on "Network.". Select the network connection you want to configure from the list on the left (e.g., Wi-Fi, Ethernet).
Click on Network. Select the ethernet connection (Built-in or USB-to-Ethernet) Set the "Configure IPv4" dropdown to Manually. Fill in the information and click Apply to save. On macOS open "System Preferences..." Click on Network Select the ethernet connection (Built-in or USB-to-Ethernet) Set the...
Setup > Lan Setup. The Setup Lan Setup page allows you to configure the settings for the Local Area Network (LAN) in your home. These settings include the range of IP addresses that define the LAN itself as well as how the addresses are assigned (automatically by DHCP or manually) as new devices are added to the network.
Enter your Mac password to authenticate the deletion.; Restart your Mac. It will automatically recreate the deleted files. Log in and connect to your Wi-Fi network.; Go to the TCP/IP setting again and check the router files. 7. Create a new network location. Creating a new network location lets your Mac start fresh with network settings and eliminate a self-assigned IP address.
Key Takeaways. To set a static IP address in Windows 10 or 11, open Settings -> Network & Internet and click Properties for your active network. Choose the "Edit" button next to IP assignment and change the type to Manual. Flip the IPv4 switch to "On", fill out your static IP details, and click Save. Sometimes, it's better to assign a PC its ...
Click "Network" and select the network you're connected to. Click on "Details" — you'll open a new window. Go to the "TCP/IP" tab, click on "Renew DHCP lease.". Tap "Apply" to confirm. 3. Check your network settings. Go to "System settings" and tap on "Network.". Select the network connected to the self ...
Step6: In Manually Assigned IP area, please fill in the device MAC address and the IP address binding to this device only. Client Name (MAC Address):Use the dropdown list to choose the device or manual enter the device's MAC address. IP address:Enter the IP address that you want to bind to this device. Please make sure the IP address needs ...
If there's a page where you can assign an IPv4 address based on a MAC address, then this is for static addresses assigned via DHCP from the router. IPv6 works differently. While there is DHCPv6, the normal way is to use SLAAC, and let each computer pick an IPv6 address based on the announced subnet prefix.So this page won't help you to assign ...
I found you can use MAC and Address Binding (under Network Map tab) to make any DHCP issued address permanent and "static" (within the DHCP pool). However, if you use the other option (under LAN>DHCP Server>Manually assigned IP), which is to manually assign a IP address to a device (outside the DHCP pool) it creates a static address, and also ...
Assign a new IP address that has never been used if that option is available. First ping test the IP address before assigning it to confirm its availability. ... Add the ethernet adapter - at this point either auto assign a MAC or manually assign one. Assign a different IP address to eliminate the possibility of duplicate IP and do a ping test.